Talk:Region Growing Segmentation
(→Seed point rasterization) |
(→Seed point rasterization) |
||
| Line 54: | Line 54: | ||
| − | In order to use the seed points in the region growing algorithm in SAGA, we have to convert the vector file to a raster file using the {{button|text=Rasterize}} module from the | + | In order to use the seed points in the region growing algorithm in SAGA, we have to convert the vector file to a raster file using the {{button|text=Rasterize}} module from the GDAL Conversions in QGIS. It is critical that we create a raster file that only contains the seed points and no-data. So every pixel outside the seed points has to be no-data. It is also critical that our rasterized vector image has the '''exact same''' CRS, extend and pixel size as the single band images. |
* In the {{button|text=Processing Toolbox}}, type 'rasterize' and select the {{button|text=Rasterize}} tool ind the SAGA geoalgorithms submenu | * In the {{button|text=Processing Toolbox}}, type 'rasterize' and select the {{button|text=Rasterize}} tool ind the SAGA geoalgorithms submenu | ||
| Line 61: | Line 61: | ||
* Select {{button|text=ID}} as {{button|text=Attribute}} and the other parameters according to the screenshot below | * Select {{button|text=ID}} as {{button|text=Attribute}} and the other parameters according to the screenshot below | ||
* Select the extend of one of the band splits as extend by clicking {{button|text=select canvas/ layers extend}} in the {{button|text=Output extend}} line | * Select the extend of one of the band splits as extend by clicking {{button|text=select canvas/ layers extend}} in the {{button|text=Output extend}} line | ||
| − | * Copy the '''exact''' cellsize from either the metadata of one of your split images | + | * Copy the '''exact''' cellsize from either the metadata of one of your split images and set output raster size to {{button|text= Output resolution in map units per pixel}} |
| − | + | * Open the {{button|text=Advanced parameters}} menu and select the parameters shown in the screen shot | |
* Save to a local file | * Save to a local file | ||
| Line 69: | Line 69: | ||
[[File:Rasterize.PNG]] | [[File:Rasterize.PNG]] | ||
| − | |||
| − | |||
| − | |||
| − | + | The result should look like this: | |
| + | [[File:Universe2.PNG]] | ||
| − | + | ||
| + | |||
| + | |||
| + | |||
| + | |||
| + | Now verify that the newly created seed point raster aligns 100% with one of the band split raster by checking the metadata and zooming into the seed pixels. | ||
| + | |||
| + | Your raster should align like this: | ||
| + | |||
| + | [[File:Seedpixel.PNG]] | ||
| + | |||
| + | |||
| + | |||
| + | If for any reason your pixels do not align or SAGA shows you, that your layer extends are not the same, you can use the {{button|text=Superimpose vector}} OTB tool in the {{button|text=Processing Toolbox}}. | ||
Translate seed raster to set all pixels to no-data that are not seeds.... | Translate seed raster to set all pixels to no-data that are not seeds.... | ||
Revision as of 11:39, 9 April 2018
Contents |
Region Growing Segementation with Saga's Seeded Region Growing Tool
The following tutorial explains how to delineate tree crowns, using SAGA's Seeded Region Growing Tool. The product, a polygon shapefile, can then be used in an object based classification, f.ex. in order to classify different tree species.
Material you need to complete the tutorial
Data
A multispectral image of the forest canopy
A canopy height model CHM
Software
QGIS 2.18.11
SAGA 2.3.2
Split multiband image into several raster images
SAGA's Region Growing Algorithm works only with single band images. Therefor, we have to split our multiband image into its individual bands following these instructions.
Seed points
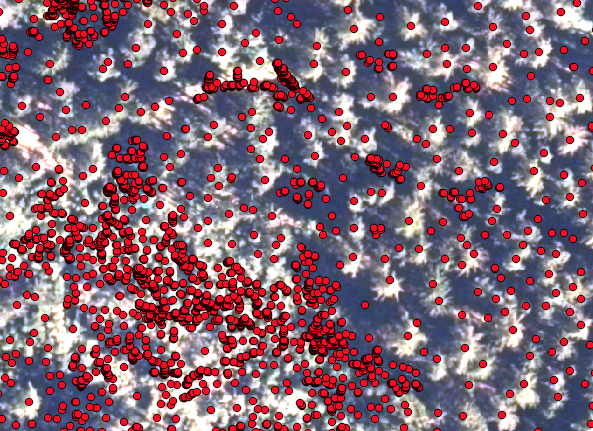
The first step here is to extract the position of the tree tops, which are going to be the starting point for the region growing algorithm. You find a description of how to derive the seed points from a CHM here . Now have a look at how the seeds align with your multiband image
In this picture you see, that the points align well with the tree tops. However, there are many points that represent small trees (in the lower left corner) which you might not be so interested in. In order to correct that, we are going to filter the points by their height in the seed shapefile and save the shapefile with the selected seeds only as a new shapefile.
If the seed points do not fit the image well, it might be due to the fact that you are using an orthophoto and not a true orthophoto. If you are working only with a smaller dataset you can help it by using the Georeferencer in the Raster menu by rubberheeting your orthophoto to make it fit. You'll find the instructions for doing so here.
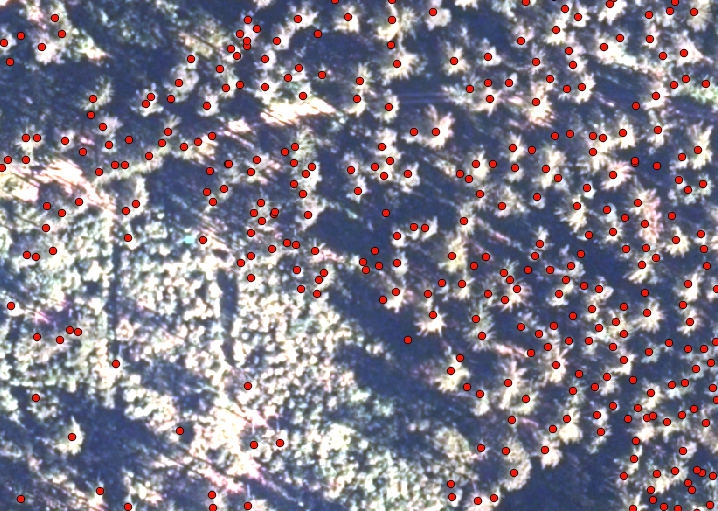
This looks much better:
Seed point rasterization
In order to use the seed points in the region growing algorithm in SAGA, we have to convert the vector file to a raster file using the Rasterize module from the GDAL Conversions in QGIS. It is critical that we create a raster file that only contains the seed points and no-data. So every pixel outside the seed points has to be no-data. It is also critical that our rasterized vector image has the exact same CRS, extend and pixel size as the single band images.
- In the Processing Toolbox, type 'rasterize' and select the Rasterize tool ind the SAGA geoalgorithms submenu
- Select the seed point shapefile as input
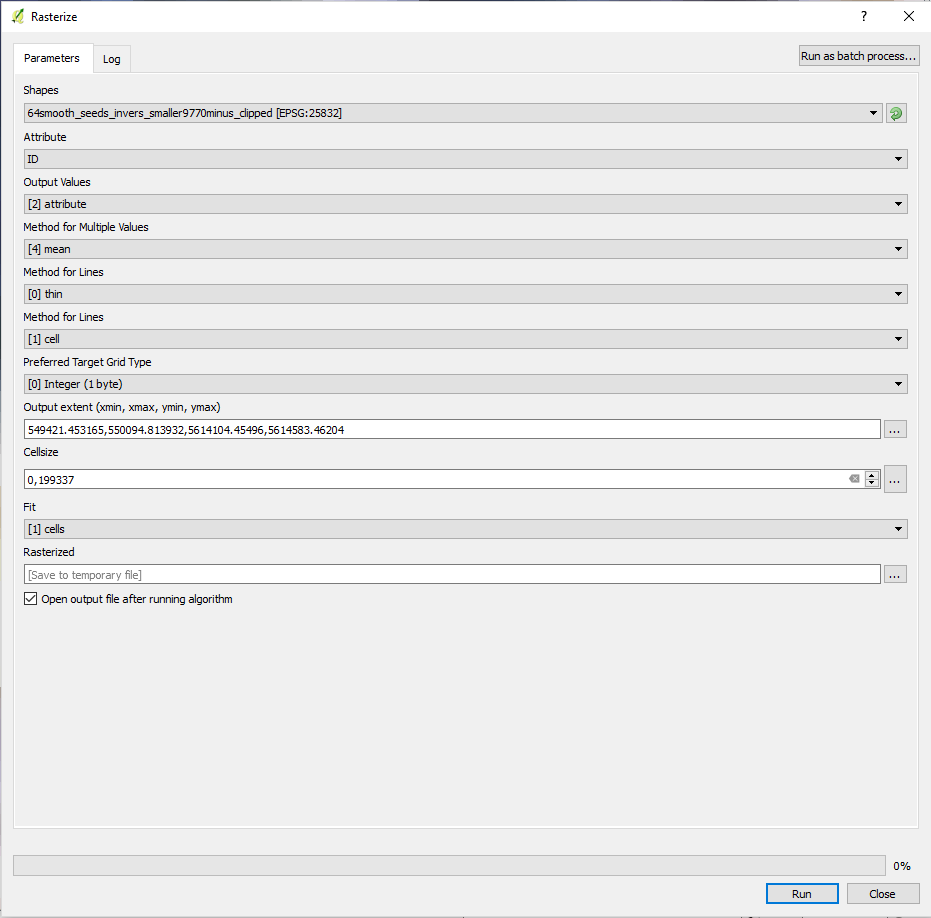
- Use the parameters shown in the screen shot or explained below
- Select ID as Attribute and the other parameters according to the screenshot below
- Select the extend of one of the band splits as extend by clicking select canvas/ layers extend in the Output extend line
- Copy the exact cellsize from either the metadata of one of your split images and set output raster size to Output resolution in map units per pixel
- Open the Advanced parameters menu and select the parameters shown in the screen shot
- Save to a local file
The result should look like this:
Now verify that the newly created seed point raster aligns 100% with one of the band split raster by checking the metadata and zooming into the seed pixels.
Your raster should align like this:
If for any reason your pixels do not align or SAGA shows you, that your layer extends are not the same, you can use the Superimpose vector OTB tool in the Processing Toolbox.
Translate seed raster to set all pixels to no-data that are not seeds....
Next: Split stack with translate picture files
next: superimpose extend and origin
Check everything: pixels should align 100%
Next saga: growing regions algorithm
Basis of algorithm citation settings export with vectorize adjust enjoy


