Vertex
(→Handling) |
(→Handling) |
||
| Line 40: | Line 40: | ||
#Read the resulting height (Figure 8: Horizontal distance = 7,9m, tree height = 24,5m) | #Read the resulting height (Figure 8: Horizontal distance = 7,9m, tree height = 24,5m) | ||
| − | <gallery width=600px height= | + | <gallery width=600px height=6000px> |
file:vertex02-messung-baumfuss.jpg|Figure 6: measurement tree bottom | file:vertex02-messung-baumfuss.jpg|Figure 6: measurement tree bottom | ||
file:vertex03-messung-baumkrone.jpg|Figure 7: tree crown measurement | file:vertex03-messung-baumkrone.jpg|Figure 7: tree crown measurement | ||
Revision as of 11:05, 4 July 2012
| sorry: |
This section is still under construction! This article was last modified on 07/4/2012. If you have comments please use the Discussion page or contribute to the article! |


Contents |
General descripition
The Vertex clinometer is a device to measure distances based on ultrasonic sound and angles. It enables to directly measure tree height based on the trigonometric principle. For the measurement of distances a transponder is needed that is fixed at the tree and is an active component that submits a signal back to the Vertex. To determine the horizontal distance to the tree the transponder has to be fixed at a certain height (default 1,3 meter) that is defined in the settings menu.

The vertex clinometer allows to measure heights from variable distances to the target. The measurement results can be stored at the display to note them later down.
Handling
To switch the instrument on, press the on-button for a while. Ensure that the internal and external temperatures are the same - if not, wait until the internal temperature has adapted. The menue pages can be selected by pressing the 'DME' and the 'IR' buttons. To switch the instrument off, press DME and IR buttons simultaneously for a while. Place the transponder directly in front of the Vertex and press 'DME' to switch the transponder on.
1. Distance measurement
- Switch the transponder on (when it is working, a quietly pulsative peep is hearable)
- Place the transporter at the target (Figure 2)
- Select the program for distance measurement
- Locate the place to measure it's distance
- Sight through the instrument pressing the 'DME-button' (Figure 3)
- The cross (Figure 4) will shutdown, when the measurement is done
- The horizontal distance appears at the display
[[file:vertex01-messung-transponder.jpg|thumb|300px|right|Figure 5: measurement of transponder
2. Height measurement
- Place the transporter at the tree (Figure 2)
- Locate a place with a good view to tree bottom and crown
- Select the program for height measurements
- Determine the horizontal distance by measuring the tansponder (Figure 5)
- Measure tree bottom (Figure 6) and tree crown (Figure 7)
- Read the resulting height (Figure 8: Horizontal distance = 7,9m, tree height = 24,5m)
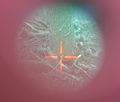
Figure 6: measurement tree bottom
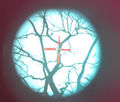
Figure 7: tree crown measurement


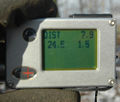
Figure 8: Display results
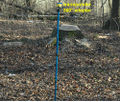
Figure 9: Installation of transponder at a plot centre

3. Distances within a centre plot
- Place the transponder at the 360° adapter and locate both vertically at the centre point (Figure 9)
- Go to the tree and locate the instrument at the tree to measure directly the distance
| Advantages | Disadvantages |
|---|---|
| slope correction implemented | height values from leaning trees are underestimated |
Notes:
Ultra waves can be affected by sounds of crickets and the sound of purling water (experiances done in Indonesia and Germany), so that the height values are biased.
The internal temperature of the Vertex needs to be the same as the external temperature - if not the values are biased.
Be sure that trees measured are done in verticak axes.
Applications
Related articles