Radiometric calibration with SNAP
From AWF-Wiki
(Difference between revisions)
(→Prerequisites) |
|||
| (18 intermediate revisions by one user not shown) | |||
| Line 1: | Line 1: | ||
| − | * Download a Sentinel-2 Level 1C tile from ESA's Copernicus Open Access Hub web service: [[Downloading Sentinel-2 images]]. | + | = Prerequisites = |
| − | * | + | * Sentinel-2 SEN2COR280 Processor plugin is already installed in SNAP (see [[Installation of SNAP]]) |
| + | * Make sure that your windows user name does not contain any spaces or special character. If this is the case you need to create a new windows user account. | ||
| + | * If your region of interest (ROI) is located in mountainous terrain a topographic illumination correction is recommended which requires a digital terrain model. The automated download link in SNAP has recently changed. Therefore, please manually download SRTM tiles covering the ROI from this [http://srtm.csi.cgiar.org/srtmdata/ CGIAR homepage]. Unzip the GeoTIFF files in a folder. | ||
| + | * Download a Sentinel-2 Level 1C tile from ESA's Copernicus Open Access Hub web service as a compressed zip file: [[Downloading Sentinel-2 images]]. | ||
| + | * Unzip the file to a folder where the path name does not contain a space or special character. | ||
| + | |||
| + | = Start atmospheric correction = | ||
* Start SNAP Desktop. | * Start SNAP Desktop. | ||
| − | * {{mitem|text=File --> Open Product...}}. Browse to the unzipped product folder and open the | + | * {{mitem|text=File --> Open Product...}}. Browse to the unzipped product folder S2XXX.SAFE and open the file MTD_MSIL1C.xml or drag and drop the product folder from the Windows file explorer into the SNAP tab Product Explorer. |
* {{mitem|text=Optical --> Thematic Land Processing --> Sen2Cor Processor --> Sen2Cor 280}} | * {{mitem|text=Optical --> Thematic Land Processing --> Sen2Cor Processor --> Sen2Cor 280}} | ||
| − | * Specify the Processing Parameters: | + | * Specify the Processing Parameters as shown in the screenshot below. Details can befound in the [http://step.esa.int/thirdparties/sen2cor/2.8.0/docs/S2-PDGS-MPC-L2A-SUM-V2.8.pdf Sen2cor manual]. |
| − | A first run will be made with 60m pixel resolution | + | |
| − | Topographic normalization is activated with '''DEM correction: TRUE'''. For '''DEM directory''' specify | + | Check '''Display execution report''' on. |
| + | |||
| + | A first run will be made with 60m pixel resolution. Computation time dependes mainly on the number of available CPUs and RAM on your local machine. You need at least 4GB RAM and 1 thread for 1 Sentinel-2 tile. Increase the NB threads accordingly to speed up parallel processing. | ||
| + | |||
| + | Set '''Cirrus correction: TRUE'''. | ||
| + | |||
| + | Topographic normalization is activated with '''DEM terrain correction: TRUE'''. For '''DEM directory''' specify the folder where dem files were downloaded and unzipped. | ||
[[File:snap_sen2cor_params.png|400px]] | [[File:snap_sen2cor_params.png|400px]] | ||
| − | * | + | * Compare the Level-2A Output Product with the Input Level-1C Product. |
| − | * | + | * Mark the Input Level-1C product name in Product Explorer. Right Click {{mitem|text=Open RGB Image Window --> Sentinel-2 MSI Natural Colors}}. {{button|text=OK}}. |
| − | * {{mitem|text=Window --> Tile horizontally}} | + | * Mark the Input Level-2A Output Product in Product Explorer. Right Click {{mitem|text=Open RGB Image Window --> Sentinel-2 MSI Natural Colors}}. {{button|text=OK}}. |
| − | * Check {{mitem|text=View --> Synchronize Image Cursors}} and {{mitem|text=View --> Synchronize Image Views}}. | + | * {{mitem|text=Window --> Tile horizontally}} |
| − | + | * Check {{mitem|text=View --> Synchronize Image Cursors}} and {{mitem|text=View --> Synchronize Image Views}}. Activate a map view by clicking into the canvas. Zoom and Pan. | |
| − | + | * Activate the map view by clicking into the canvas of the Output Product. Click '''Mask Manager''' tab on the right. | |
| − | + | ||
| − | * | + | |
* Check the mask layers '''scl_cloud_shadow''', '''scl_cloud_medium_proba''', '''scl_cloud_high_proba''', '''scl_thin_cirrus''' in the Mask Manager. | * Check the mask layers '''scl_cloud_shadow''', '''scl_cloud_medium_proba''', '''scl_cloud_high_proba''', '''scl_thin_cirrus''' in the Mask Manager. | ||
[[File:snap_mask_overlay2.png|800px]] | [[File:snap_mask_overlay2.png|800px]] | ||
| − | * For second run choose in Processing Parameters: Spatial '''Resolution: | + | |
| + | * For a second run choose in Processing Parameters: Spatial '''Resolution: All''' (m). This time all bands are processed with 10m and 20m pixel size. Be patient, processing takes some time ... | ||
[[Category:SNAP Tutorial]] | [[Category:SNAP Tutorial]] | ||
[[Category:Tutorials]] | [[Category:Tutorials]] | ||
Latest revision as of 21:50, 29 November 2020
[edit] Prerequisites
- Sentinel-2 SEN2COR280 Processor plugin is already installed in SNAP (see Installation of SNAP)
- Make sure that your windows user name does not contain any spaces or special character. If this is the case you need to create a new windows user account.
- If your region of interest (ROI) is located in mountainous terrain a topographic illumination correction is recommended which requires a digital terrain model. The automated download link in SNAP has recently changed. Therefore, please manually download SRTM tiles covering the ROI from this CGIAR homepage. Unzip the GeoTIFF files in a folder.
- Download a Sentinel-2 Level 1C tile from ESA's Copernicus Open Access Hub web service as a compressed zip file: Downloading Sentinel-2 images.
- Unzip the file to a folder where the path name does not contain a space or special character.
[edit] Start atmospheric correction
- Start SNAP Desktop.
- File --> Open Product.... Browse to the unzipped product folder S2XXX.SAFE and open the file MTD_MSIL1C.xml or drag and drop the product folder from the Windows file explorer into the SNAP tab Product Explorer.
- Optical --> Thematic Land Processing --> Sen2Cor Processor --> Sen2Cor 280
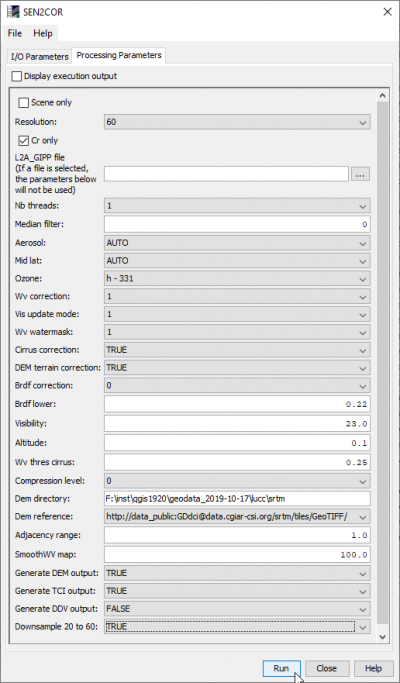
- Specify the Processing Parameters as shown in the screenshot below. Details can befound in the Sen2cor manual.
Check Display execution report on.
A first run will be made with 60m pixel resolution. Computation time dependes mainly on the number of available CPUs and RAM on your local machine. You need at least 4GB RAM and 1 thread for 1 Sentinel-2 tile. Increase the NB threads accordingly to speed up parallel processing.
Set Cirrus correction: TRUE.
Topographic normalization is activated with DEM terrain correction: TRUE. For DEM directory specify the folder where dem files were downloaded and unzipped.
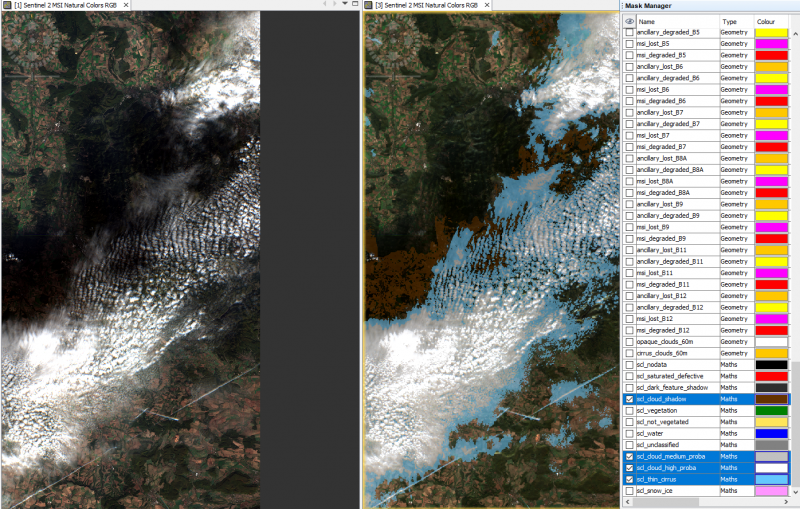
- Compare the Level-2A Output Product with the Input Level-1C Product.
- Mark the Input Level-1C product name in Product Explorer. Right Click Open RGB Image Window --> Sentinel-2 MSI Natural Colors. OK.
- Mark the Input Level-2A Output Product in Product Explorer. Right Click Open RGB Image Window --> Sentinel-2 MSI Natural Colors. OK.
- Window --> Tile horizontally
- Check View --> Synchronize Image Cursors and View --> Synchronize Image Views. Activate a map view by clicking into the canvas. Zoom and Pan.
- Activate the map view by clicking into the canvas of the Output Product. Click Mask Manager tab on the right.
- Check the mask layers scl_cloud_shadow, scl_cloud_medium_proba, scl_cloud_high_proba, scl_thin_cirrus in the Mask Manager.
- For a second run choose in Processing Parameters: Spatial Resolution: All (m). This time all bands are processed with 10m and 20m pixel size. Be patient, processing takes some time ...

