Blume-Leiss
(→General description) |
|||
| (36 intermediate revisions by 4 users not shown) | |||
| Line 1: | Line 1: | ||
| − | {{ | + | {{Ficontent}} {{video|link=https://youtu.be/EahhlAazK1Y}} |
| − | + | ||
| − | + | ||
==General description== | ==General description== | ||
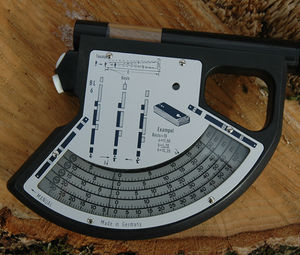
The Blume Leiss is developed to measure slope and [[tree height]] by [[the trigonometric principle]]. The device measures the elevation angle between the operator and measured points. Tree heights can directly be read from the device depending on fixed distances of 15m, 20m, 30m and 40m. For mountainous areas [[Fixed_area_plots#Slope_correction|slope correction]] factors can directly be read from the device depending on the slope. | The Blume Leiss is developed to measure slope and [[tree height]] by [[the trigonometric principle]]. The device measures the elevation angle between the operator and measured points. Tree heights can directly be read from the device depending on fixed distances of 15m, 20m, 30m and 40m. For mountainous areas [[Fixed_area_plots#Slope_correction|slope correction]] factors can directly be read from the device depending on the slope. | ||
Figure 1 shows the front side of the device including: | Figure 1 shows the front side of the device including: | ||
| − | * example for the viewing while measuring distance with the | + | * example for the viewing while measuring distance with the vertical base measure, |
| − | * the scales of height measurement for the fixed distances to the tree (15, 20, 30 and 40m) | + | * the scales of height measurement for the fixed distances to the tree (15, 20, 30 and 40m) and |
* scale for slope measurement in °. | * scale for slope measurement in °. | ||
| − | + | ||
| − | + | ||
<gallery widths=300px heights=300px> | <gallery widths=300px heights=300px> | ||
file: blume-leiss01_portrait-01_messung.jpg|Figure 1: Blume Leiss front (result of an measurement) | file: blume-leiss01_portrait-01_messung.jpg|Figure 1: Blume Leiss front (result of an measurement) | ||
| Line 15: | Line 12: | ||
</gallery> | </gallery> | ||
| − | The optical rangefinder (figure 2) allows the user to measure the distance to the tree by mirroring a picture of the levelling board. | + | In this example the type of the device (BL6) has two buttons two separately lockable needles (figure 1), so that the height between the operator and the stem foot / tree crown can directly be read. The difference between the measurements will be tree height <math>h_t</math>: |
| − | Figure 2 shows the backside of the device where information is given | + | <math> |
| − | * | + | h_t=h_c-h_b |
| + | </math> | ||
| + | |||
| + | If the slope is larger than 5 degrees, the tree heights need to be corrected by the formula $CF=\cos\alpha_i$. This correction factor (CF) has to be multiplied with the measured tree height (since we measured a slope distance and not the horizontal distance to the tree). The correction factor on the backside of the instrument assumes that the distance is measured optical (the inbuild prism) and is $CF=(\cos\alpha_i)^2$. This is because we have an inclined view on the levelling bord. | ||
| + | |||
| + | The optical rangefinder (figure 2) allows the user to measure the distance to the tree by mirroring a picture of the levelling board. Figure 2 shows the backside of the device where information is given about: | ||
| + | *Height caluation | ||
**b-a=h (slope > 5° - viewing downwards) | **b-a=h (slope > 5° - viewing downwards) | ||
**a+b=H (slope < 5° - viewing horizontal) | **a+b=H (slope < 5° - viewing horizontal) | ||
**a-b=h (slope > 5° - viewing upwards) | **a-b=h (slope > 5° - viewing upwards) | ||
| − | * | + | *Correction factors |
**correction factor depending on slope in ° | **correction factor depending on slope in ° | ||
**slope in ° depending on slope in % | **slope in ° depending on slope in % | ||
==Handling== | ==Handling== | ||
| − | + | ===Distance measurement=== | |
| − | + | # Determine an optimal distance to the tree by checking the visibility of the tree bottom and tree top within the forest stand, | |
| − | + | # Place the vertical base measure at the tree, | |
| − | # | + | # Find the correct fixed distance using the optical range finder by focusing the distance leveling board (figure 3b) and move closer or farther to the tree, until the top of the mirrored picture of the base is coincident with the corresponding mark on the original picture - in this example, the mid mark of the leveling corresponds to a distance of 15m (alternatively a tape measure can be used to find the correct fixed distance). |
| − | + | ||
| − | |||
| − | |||
| − | |||
| − | |||
<gallery widths=300px heights=300px> | <gallery widths=300px heights=300px> | ||
| − | file: blume-leiss03_distance-leveling-board.jpg|Figure 3a: | + | file: blume-leiss03_distance-leveling-board.jpg|Figure 3a: Vertical base fixed at the tree |
| − | file: blume-leiss03_distance-measurement.jpg|Figure 3b: live view through | + | file: blume-leiss03_distance-measurement.jpg|Figure 3b: live view through range finder. The white strips of the mirrored and original picture of the base must coincide to find the respective fixed distance. |
</gallery> | </gallery> | ||
| − | + | ===Height measurement=== | |
| − | + | # Focus the bottom of the tree (figure 4a) and lock the pendulum, | |
| + | # Focus the top of the tree (figure 4b) and lock the second pendulum, | ||
| + | # The front side of the device (figure 1) shows two height values - the height can directly be derived by the formulas described above, depending on the slope | ||
| + | # Correct the derived height if necessary | ||
| + | |||
| + | ===Slope measurement=== | ||
| + | # Sight at the zero mark of the levelling board and lock the needle | ||
| + | # The slope in ° can directly be read from the scale (figure 1) | ||
| + | |||
| + | |||
<gallery widths=300px heights=300px> | <gallery widths=300px heights=300px> | ||
file: blume-leiss04_mess-baumfuss_markiert.jpg|Figure 4a: live view measuring tree bottom | file: blume-leiss04_mess-baumfuss_markiert.jpg|Figure 4a: live view measuring tree bottom | ||
| Line 48: | Line 55: | ||
</gallery> | </gallery> | ||
| − | + | ||
| − | + | {{info | |
| − | + | |message=Note: | |
| − | + | |text= When measuring with Blume Leiss, you need to observe the pendulum check mark to be sure, that the pendulum has stopped oscillating before locking the button. All scales are visible at once - be careful of taking the necessary scale. | |
| − | + | }} | |
| − | + | ||
| − | + | ||
| − | + | ||
| − | When measuring with Blume Leiss, you need to observe the pendulum check mark to be sure, that the pendulum has stopped oscillating before locking the button. | + | |
{| class="wikitable" | {| class="wikitable" | ||
| Line 64: | Line 67: | ||
|- | |- | ||
|slope correction implemented | |slope correction implemented | ||
| + | |dependance on fixed scales | ||
|- | |- | ||
|optical distance measurement | |optical distance measurement | ||
| Line 82: | Line 86: | ||
* [[The trigonometric principle]] | * [[The trigonometric principle]] | ||
* [[Bitterlich sampling]] | * [[Bitterlich sampling]] | ||
| − | + | {{Studienbeiträge}} | |
| − | [[Category: ]] | + | [[Category:Clinometer]] |
Latest revision as of 09:28, 12 March 2021
Contents |
[edit] General description
The Blume Leiss is developed to measure slope and tree height by the trigonometric principle. The device measures the elevation angle between the operator and measured points. Tree heights can directly be read from the device depending on fixed distances of 15m, 20m, 30m and 40m. For mountainous areas slope correction factors can directly be read from the device depending on the slope. Figure 1 shows the front side of the device including:
- example for the viewing while measuring distance with the vertical base measure,
- the scales of height measurement for the fixed distances to the tree (15, 20, 30 and 40m) and
- scale for slope measurement in °.
In this example the type of the device (BL6) has two buttons two separately lockable needles (figure 1), so that the height between the operator and the stem foot / tree crown can directly be read. The difference between the measurements will be tree height \(h_t\)\[ h_t=h_c-h_b \]
If the slope is larger than 5 degrees, the tree heights need to be corrected by the formula $CF=\cos\alpha_i$. This correction factor (CF) has to be multiplied with the measured tree height (since we measured a slope distance and not the horizontal distance to the tree). The correction factor on the backside of the instrument assumes that the distance is measured optical (the inbuild prism) and is $CF=(\cos\alpha_i)^2$. This is because we have an inclined view on the levelling bord.
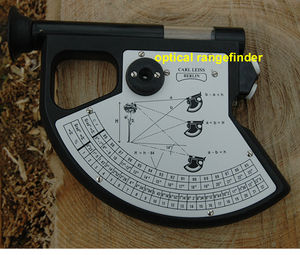
The optical rangefinder (figure 2) allows the user to measure the distance to the tree by mirroring a picture of the levelling board. Figure 2 shows the backside of the device where information is given about:
- Height caluation
- b-a=h (slope > 5° - viewing downwards)
- a+b=H (slope < 5° - viewing horizontal)
- a-b=h (slope > 5° - viewing upwards)
- Correction factors
- correction factor depending on slope in °
- slope in ° depending on slope in %
[edit] Handling
[edit] Distance measurement
- Determine an optimal distance to the tree by checking the visibility of the tree bottom and tree top within the forest stand,
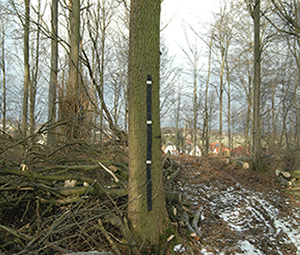
- Place the vertical base measure at the tree,
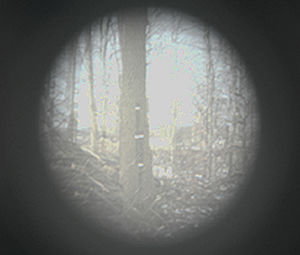
- Find the correct fixed distance using the optical range finder by focusing the distance leveling board (figure 3b) and move closer or farther to the tree, until the top of the mirrored picture of the base is coincident with the corresponding mark on the original picture - in this example, the mid mark of the leveling corresponds to a distance of 15m (alternatively a tape measure can be used to find the correct fixed distance).
[edit] Height measurement
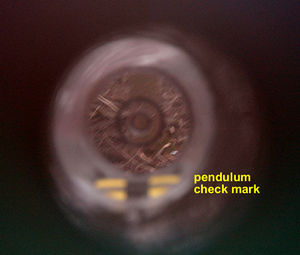
- Focus the bottom of the tree (figure 4a) and lock the pendulum,
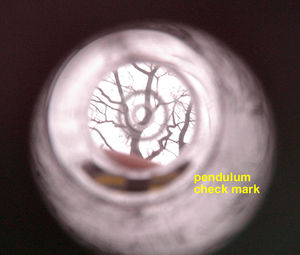
- Focus the top of the tree (figure 4b) and lock the second pendulum,
- The front side of the device (figure 1) shows two height values - the height can directly be derived by the formulas described above, depending on the slope
- Correct the derived height if necessary
[edit] Slope measurement
- Sight at the zero mark of the levelling board and lock the needle
- The slope in ° can directly be read from the scale (figure 1)
 Note:
Note:
- When measuring with Blume Leiss, you need to observe the pendulum check mark to be sure, that the pendulum has stopped oscillating before locking the button. All scales are visible at once - be careful of taking the necessary scale.
| Advantages | Disadvantages |
|---|---|
| slope correction implemented | dependance on fixed scales |
| optical distance measurement | fixed distances to the tree (could be difficult in closed forest stands) |
| independence of power sources (no batteries needed) | in dark forest stand optical measurement is difficult |
| no digital storage of measurement results available. |
[edit] Applications
