Trimble Juno GPS
From AWF-Wiki
(Difference between revisions)
(→Startup and configuration) |
|||
| Line 11: | Line 11: | ||
== Getting started with the GPS receiver == | == Getting started with the GPS receiver == | ||
===Startup and configuration=== | ===Startup and configuration=== | ||
| − | [[Image:Trimble_Setup.jpg|thumb|right|150px|''Trimble Juno 3B'' setup menu]] | + | [[Image:Trimble_Setup.jpg|thumb|right|150px|'''Figure A''':''Trimble Juno 3B'' setup menu]] |
# Press the power button for a few seconds | # Press the power button for a few seconds | ||
# Open the windows menu (by selecting on screen or pushing the windows-button) and select {{mitem|text=TerraSync --> Professional Edition}}. You are redirected to the {{button|text=Status}} menu, with a [[:wikipedia:compass rose|compass rose]] displayed in the center of the screen. Wait for a few minutes, until you get a connection to at least three satellites, which are displayed by little symbols on the compass rose. | # Open the windows menu (by selecting on screen or pushing the windows-button) and select {{mitem|text=TerraSync --> Professional Edition}}. You are redirected to the {{button|text=Status}} menu, with a [[:wikipedia:compass rose|compass rose]] displayed in the center of the screen. Wait for a few minutes, until you get a connection to at least three satellites, which are displayed by little symbols on the compass rose. | ||
| Line 44: | Line 44: | ||
==Processing in QGIS== | ==Processing in QGIS== | ||
| − | [[Image:RemSens_Exercise02_1.png|thumb|right|450px|'''Figure | + | [[Image:RemSens_Exercise02_1.png|thumb|right|450px|'''Figure C:''': The [[QGIS]] 2.0 plugin manager]] |
# Open [[QGIS]]. | # Open [[QGIS]]. | ||
| − | # Select {{mitem|text=Plugin --> Manage and install plugins}}. Activate the {{typed|text=GPS-Tool}} and {{typed|text=eVIS}} plugins (you can find them by typing the plugin names into the {{button|text=Search}} bar) as in '''figure | + | # Select {{mitem|text=Plugin --> Manage and install plugins}}. Activate the {{typed|text=GPS-Tool}} and {{typed|text=eVIS}} plugins (you can find them by typing the plugin names into the {{button|text=Search}} bar) as in '''figure C'''. |
# Click the GPS tools icon [[Image:QGIS_2.0_GPSTools.png|20px]] and select {{button|text=Load GPX File}}. If you already saved a GPX-file on you computer, browse to the file. If you want to download it from the receiver, connect it to the computer and select {{mitem|text=Download from GPS}}. | # Click the GPS tools icon [[Image:QGIS_2.0_GPSTools.png|20px]] and select {{button|text=Load GPX File}}. If you already saved a GPX-file on you computer, browse to the file. If you want to download it from the receiver, connect it to the computer and select {{mitem|text=Download from GPS}}. | ||
# Load a raster map, e.g. from the [[Course data|course data]] and locate it under the GPS points (see [[Exercise 01: First steps in QGIS|Exercise 01]] on how to load layers). You can find an aerial photograph of the forestry faculty under ''geodata/raster/aerial/aerial_utm32_WGS84.tif''. | # Load a raster map, e.g. from the [[Course data|course data]] and locate it under the GPS points (see [[Exercise 01: First steps in QGIS|Exercise 01]] on how to load layers). You can find an aerial photograph of the forestry faculty under ''geodata/raster/aerial/aerial_utm32_WGS84.tif''. | ||
# Open the attribute table of layer {{button|text=tree waypoint, waypoints}} by right-clicking the layer in the [[TOC]] and selecting {{button|text=Open Attribute Table}}. | # Open the attribute table of layer {{button|text=tree waypoint, waypoints}} by right-clicking the layer in the [[TOC]] and selecting {{button|text=Open Attribute Table}}. | ||
| − | # Click {{button|text=Toggle editing mode}} [[Image:QGIS_2.0_Edit.png|20px]] to edit or add information. For example, you can change a trees' name in the name column. To add a picture of the point: Type the paths to the pictures into the {{button|text=url}} column. To save the changes, click {{button|text=Toggle editing mode}} again and confirm with {{button|text=Save}}. You can also save while editing by clicking the {{button|text=Save}} [[Image:QGIS_2.0_SaveEdit.png|20px]] button (see '''figure | + | # Click {{button|text=Toggle editing mode}} [[Image:QGIS_2.0_Edit.png|20px]] to edit or add information. For example, you can change a trees' name in the name column. To add a picture of the point: Type the paths to the pictures into the {{button|text=url}} column. To save the changes, click {{button|text=Toggle editing mode}} again and confirm with {{button|text=Save}}. You can also save while editing by clicking the {{button|text=Save}} [[Image:QGIS_2.0_SaveEdit.png|20px]] button (see '''figure D'''). |
<!--# To add a new column: | <!--# To add a new column: | ||
## Right click the layer in the [[TOC]] and select {{button|text=Save as}}. Select {{typed|text=ESRI Shapefile}} from the {{button|text=Format}} pulldown-menu and enter (or browse to) the desired path in the {{button|text=Save as}} field (recommendation: save the file under ''<your_geodata_folder>/vector/tree_waypoints.shp''). Check the {{button|text=Add saved file to map}} box. Confirm with {{button|text=OK}}.--> | ## Right click the layer in the [[TOC]] and select {{button|text=Save as}}. Select {{typed|text=ESRI Shapefile}} from the {{button|text=Format}} pulldown-menu and enter (or browse to) the desired path in the {{button|text=Save as}} field (recommendation: save the file under ''<your_geodata_folder>/vector/tree_waypoints.shp''). Check the {{button|text=Add saved file to map}} box. Confirm with {{button|text=OK}}.--> | ||
| − | # To view the full information for a point, select {{mitem|text=Database --> eVis --> eVis Event Id Tool}}. Select the tree waypoints layer in the [[TOC]] and select a point. The {{button|text=eVis Event Browse}} opens ('''figure | + | # To view the full information for a point, select {{mitem|text=Database --> eVis --> eVis Event Id Tool}}. Select the tree waypoints layer in the [[TOC]] and select a point. The {{button|text=eVis Event Browse}} opens ('''figure D'''). The image of the trees should be shown in the browser. If not, check the path to the file again. You can adjust the setting of [[relative and absolute paths]] in the {{button|text=Options}} tab. Here, you can select {{button|text=Path is relative}}, if you want to store [[relative and absolute paths|relative paths]]. To display the direction from which the picture was taken, check the box {{button|text=Display compass bearing}}. |
{|class='Wikitable' | {|class='Wikitable' | ||
| − | |[[Image:RemSens_Exercise02_2.png|thumb|right|450px|'''Figure | + | |[[Image:RemSens_Exercise02_2.png|thumb|right|450px|'''Figure D:''': [[QGIS]] 2.0 with aerial photograph of the Göttingen University forest faculty and open attribute table of the trees GPX layer]] |
| − | |[[Image:RemSens_Exercise02_3.png|thumb|left|450px|'''Figure | + | |[[Image:RemSens_Exercise02_3.png|thumb|left|450px|'''Figure E:''': [[QGIS]] 2.0 with ''eVis Event Browser'']] |
|} | |} | ||
[[Category:QGIS exercises 2013/14|02]] | [[Category:QGIS exercises 2013/14|02]] | ||
Revision as of 12:10, 26 November 2013
| sorry: |
This section is still under construction! This article was last modified on 11/26/2013. If you have comments please use the Discussion page or contribute to the article! |
- This exercise is part of the QGIS Tutorial 2013/14.
In this exercise you'll get an introduction on how to handle a GPS receiver and how to process data in QGIS
During the practical exercise, we work with the GPS receiver Trimble Juno 3B by Trimble navigation. Of course, there are different GPS navigation devices on the market, supplied by several manufacturers, e.g. those listed on the wikipedia page.
Contents |
Getting started with the GPS receiver
Startup and configuration
- Press the power button for a few seconds
- Open the windows menu (by selecting on screen or pushing the windows-button) and select TerraSync --> Professional Edition. You are redirected to the Status menu, with a compass rose displayed in the center of the screen. Wait for a few minutes, until you get a connection to at least three satellites, which are displayed by little symbols on the compass rose.
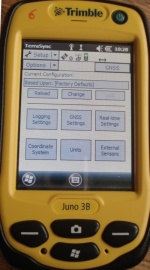
- Set the coordinate system and other parameters
- To set the coordinate system and other parameters, select the upper of the two pull down menus at the top left corner of the screen (right now, Status should be displayed here). Select Setup. Alternatively, you can select the wrench symbol to enter the setup menu.
- Select the Coordinate system menu.
- Set all parameters to the desired configuration:
- For this exercise, you can select Germany under System, UTM Zone 32 as the Zone and WGS 1984 as the Datum. Leave all other configurations as they are.
- Confirm with Done.
To find a specific spatial point:
- Set the target
- Select Upper --> Data --> Lower --> Existing Data/New
- Select the folder containing the data (e.g. the tree-waypoints used in the exercise) and click Open.
- Select the point you want to navigate to (e.g. Tree01.
- Click Options-->Set Nav Target and set the point you selected before.
- Set the background map
- Select Upper --> Map.
- Click Layers and check the Background and GNSS trail boxes. The background map should now be displayed.
- To zoom in to your location on the map, select Option --> Auto pan to GNSS position or Auto pan to selection for manual zooming.
- Your position and target appear as symbols? on the map.
- Navigation to the target:
- Select Upper --> Map to see the overview of your position and target.
- Select Upper --> Navigation.
- Follow the displayed compass and also check the Distance tab. Note that you need to move to get the compass working.
- To determin the precise position of ground control points (GCPs):
- After having set a target, select New and enter the name of the point (e.g. GCP01). Confirm by clicking Create.
- Select Point generic --> OK.
- Select Option --> Logging interval and set the interval to 1 second.
- Wait for an interval of 100 Blinks and press Done. Confirm with Yes and your point is saved.
Processing in QGIS

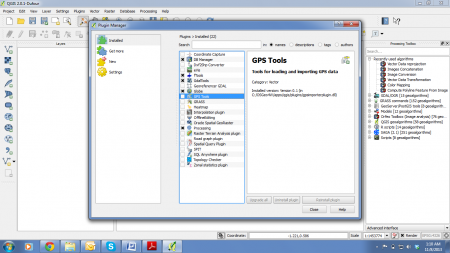
Figure C:: The QGIS 2.0 plugin manager
- Open QGIS.
- Select Plugin --> Manage and install plugins. Activate the GPS-Tool and eVIS plugins (you can find them by typing the plugin names into the Search bar) as in figure C.
- Click the GPS tools icon
 and select Load GPX File. If you already saved a GPX-file on you computer, browse to the file. If you want to download it from the receiver, connect it to the computer and select Download from GPS.
- Load a raster map, e.g. from the course data and locate it under the GPS points (see Exercise 01 on how to load layers). You can find an aerial photograph of the forestry faculty under geodata/raster/aerial/aerial_utm32_WGS84.tif.
- Open the attribute table of layer tree waypoint, waypoints by right-clicking the layer in the TOC and selecting Open Attribute Table.
- Click Toggle editing mode
 to edit or add information. For example, you can change a trees' name in the name column. To add a picture of the point: Type the paths to the pictures into the url column. To save the changes, click Toggle editing mode again and confirm with Save. You can also save while editing by clicking the Save
  button (see figure D).
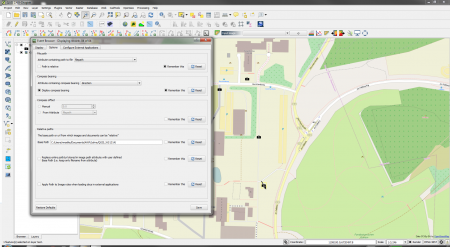
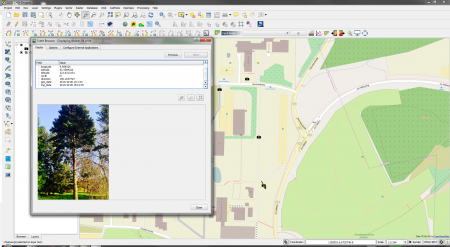
- To view the full information for a point, select Database --> eVis --> eVis Event Id Tool. Select the tree waypoints layer in the TOC and select a point. The eVis Event Browse opens (figure D). The image of the trees should be shown in the browser. If not, check the path to the file again. You can adjust the setting of relative and absolute paths in the Options tab. Here, you can select Path is relative, if you want to store relative paths. To display the direction from which the picture was taken, check the box Display compass bearing.
 Figure D:: QGIS 2.0 with aerial photograph of the Göttingen University forest faculty and open attribute table of the trees GPX layer |
 Figure E:: QGIS 2.0 with eVis Event Browser |
