Blume-Leiss
| sorry: |
This section is still under construction! This article was last modified on 06/28/2012. If you have comments please use the Discussion page or contribute to the article! |
Contents |
General description
The Blume Leiss is developed to measure slope and tree height by the trigonometric principle. The device measures the elevation angle between the operator and measured points. Tree heights can directly be read from the device depending on fixed distances of 15m, 20m, 30m and 40m. For mountainous areas slope correction factors can directly be read from the device depending on the slope. Figure 1 shows the front side of the device including:
- example for the viewing while measuring distance with the levelling board,
- the scales of height measurement for the fixed distances to the tree (15, 20, 30 and 40m) and
- scale for slope measurement in °.
In this example the type of the device (BL6) has two buttons two separately lockable needles (figure 1), so that the height between the actor and the tree bottom/tree crown can directly be read.
The difference between the measurements will be tree height –
\[ {h_t} = {h_c} - {h_b} \].
If the slope is larger than 5 degrees, the tree heights need to be corrected by the formula e*tan αi. This correction factor (CF) has to be multiplied with the tree height.
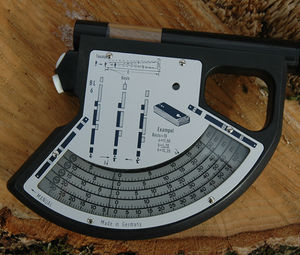
Figure 1: Blume Leiss front (result of an measurement)
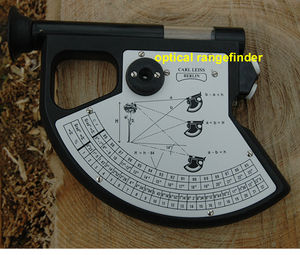
Figure 2: Blume Leiss back


The optical rangefinder (figure 2) allows the user to measure the distance to the tree by mirroring a picture of the levelling board. Figure 2 shows the backside of the device where information is given about:
- Height caluation
- b-a=h (slope > 5° - viewing downwards)
- a+b=H (slope < 5° - viewing horizontal)
- a-b=h (slope > 5° - viewing upwards)
- Correction factors
- correction factor depending on slope in °
- slope in ° depending on slope in %
Handling
1. Distance measurement
- Determine an optimal distance to the tree by checking the view field to tree bottom and top within the forest stand - preferably 15, 20, 30 or 40m.
- Place the levelling board at the tree.
- Take place at the estimated distance to the tree
- Gauge the exact distance focussing the distance levelling board (figure 3b) and move closer or farther to the tree, till the top of the mirrored board is coincident with the corresponding mark on the levelling board - in this example, the mid mark of the levelling corresponds to a distance of 15m
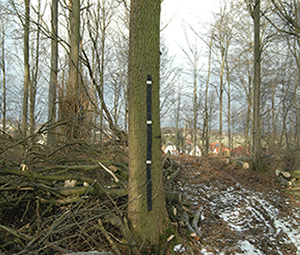
Figure 3a: Distance levelling board
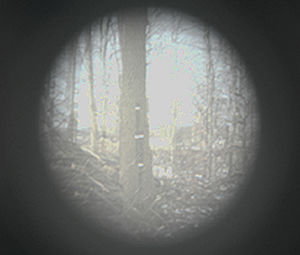
Figure 3b: live view through rangefinder


2. Height measurement
- Focus the bottom of the tree (figure 4a) and lock the pendulum
- Focus the top of the tree (figure 4b) and lock the second pendulum
- The front side of the device (figure 1) shows two height values - the height can directly be derived by the formulas described above, depending on the slope
3. Slope measurement
- Sight at the zero mark of the levelling board and lock the needle
- The slope in ° can directly be read from the scale (figure 1)
4. Correct the derived height if necessary
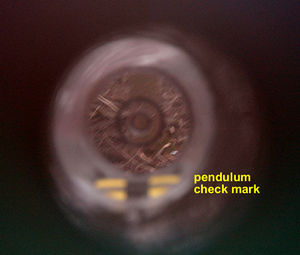
Figure 4a: live view measuring tree bottom
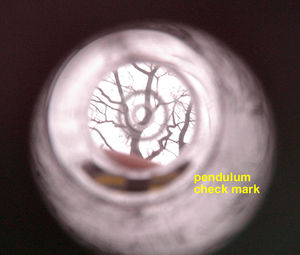
Figure 4b: live view measuring tree crown


Notes:
When measuring with Blume Leiss, you need to observe the pendulum check mark to be sure, that the pendulum has stopped oscillating before locking the button.
All scales are visible at once - be careful of taking the necessary scale.
| Advantages | Disadvantages |
|---|---|
| slope correction implemented | dependance on fixed scales |
| optical distance measurement | fixed distances to the tree (could be difficult in closed forest stands) |
| independence of power sources (no batteries needed) | in dark forest stand optical measurement is difficult |
| no digital storage of measurement results available. |
Applications
Related articles
[[Category:]]