Co-registration with SNAP
From AWF-Wiki
(Difference between revisions)
| Line 5: | Line 5: | ||
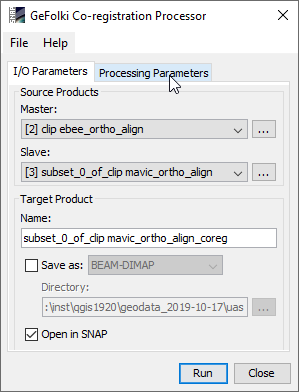
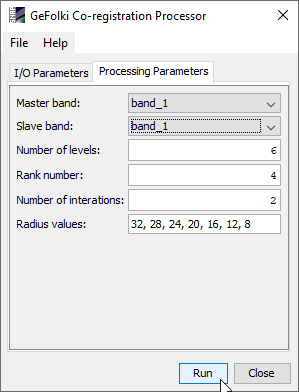
[[File:snap_gefolki_io.png|400px]] [[File:snap_gefolki_params.png|400px]] | [[File:snap_gefolki_io.png|400px]] [[File:snap_gefolki_params.png|400px]] | ||
Click {{button|text=Run}}. | Click {{button|text=Run}}. | ||
| − | Repeat this for Band 2 and Band 3. Ajust the output file name and the Processing parameters for each band. | + | # Repeat this for Band 2 and Band 3. Ajust the output file name and the Processing parameters for each band. |
[[Category:SNAP Tutorial]] | [[Category:SNAP Tutorial]] | ||
[[Category:Tutorials]] | [[Category:Tutorials]] | ||
Revision as of 15:07, 1 November 2019
- Start SNAP Desktop
- File --> Open Product... Browse and mark UAS ortho mosiacs. \geodata\uas\clip_ebee_ortho_align.tif is the master image and \geodata\uas\clip_mavic_ortho_align.tif is the slave image. Open or drag and drop marked files from Windows File Explorer into the SNAP Product Explorer tab.
- Raster --> Geometric operations --> GeFolki Co-registration.
Define the i/O paramaters and the Processing Parameters:

 Click Run.
- Repeat this for Band 2 and Band 3. Ajust the output file name and the Processing parameters for each band.