Creating regular grid
From AWF-Wiki
(Difference between revisions)
| Line 2: | Line 2: | ||
* Click {{button|text=Open}}, the raster layer appears on the QGIS canvas. | * Click {{button|text=Open}}, the raster layer appears on the QGIS canvas. | ||
* In the search engine of the Processing Toolbox, type Regular Points and select '''Regular points''' under Vector creation tools of QGIS. | * In the search engine of the Processing Toolbox, type Regular Points and select '''Regular points''' under Vector creation tools of QGIS. | ||
| − | * | + | * Click the button {{button|text=...}} of Input extent click '''Select layer/canvas extent''' and choose the raster layer. |
* Tick '''Use point spacing'''. | * Tick '''Use point spacing'''. | ||
* Enter 100 as Point spacing (in meters). | * Enter 100 as Point spacing (in meters). | ||
Latest revision as of 13:26, 26 November 2017
- Click the Add raster layer
 and select the file C:/OSGeo4W64/geodata/raster/s2/Subset_S2A_MSIL2A_20170619T.tif.
- Click Open, the raster layer appears on the QGIS canvas.
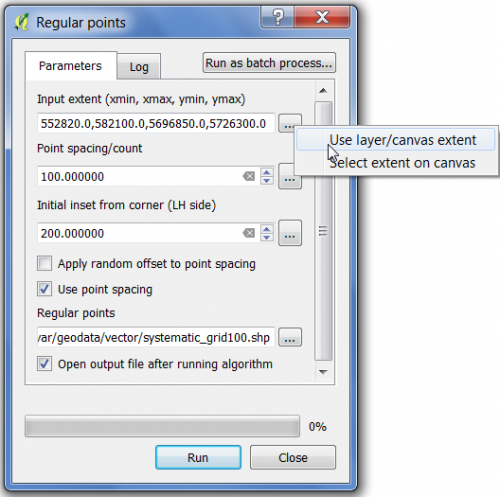
- In the search engine of the Processing Toolbox, type Regular Points and select Regular points under Vector creation tools of QGIS.
- Click the button ... of Input extent click Select layer/canvas extent and choose the raster layer.
- Tick Use point spacing.
- Enter 100 as Point spacing (in meters).
- Enter 200 as Initial inset from corner (Upper left, in meters).
- Specify the directory and file name for saving.
- Click on Run to execute the algorithm.
