Co-registration with SNAP
From AWF-Wiki
(Difference between revisions)
| Line 1: | Line 1: | ||
| + | # Visualize geometric offset | ||
* Start SNAP Desktop | * Start SNAP Desktop | ||
* {{mitem|text=File --> Open Product...}}. Browse for Unmanned Aerial System (UAS) ortho mosaics: | * {{mitem|text=File --> Open Product...}}. Browse for Unmanned Aerial System (UAS) ortho mosaics: | ||
| Line 5: | Line 6: | ||
* Mark the image to be registered ''clip_mavic_ortho_align.tif'' in ToC. Right click {{mitem|text= Open RGB Image Window --> OK}}. | * Mark the image to be registered ''clip_mavic_ortho_align.tif'' in ToC. Right click {{mitem|text= Open RGB Image Window --> OK}}. | ||
* {{mitem|text= Window --> Tile Vertically}}. Both side-by-side windows are spatially linked. Zoom in and use the {{button|text=Panning tool}} to see the offset between both images | * {{mitem|text= Window --> Tile Vertically}}. Both side-by-side windows are spatially linked. Zoom in and use the {{button|text=Panning tool}} to see the offset between both images | ||
| + | # Split multiband to single band files | ||
* Mark the image to be registered ''clip_mavic_ortho_align.tif'' in ToC. {{mitem|text=Raster --> Subset --> Band Subset}}. Check exclusivly '''band_1'''. | * Mark the image to be registered ''clip_mavic_ortho_align.tif'' in ToC. {{mitem|text=Raster --> Subset --> Band Subset}}. Check exclusivly '''band_1'''. | ||
[[File:snap_specify_band_subset_band_1.png|300px]] | [[File:snap_specify_band_subset_band_1.png|300px]] | ||
* Repeat this step for band_2 and band_3 creating separated single bands of the image to be registered . | * Repeat this step for band_2 and band_3 creating separated single bands of the image to be registered . | ||
| + | # Co-registration of single band raster files | ||
* {{mitem|text=Raster --> Geometric operations --> GeFolki Co-registration}}. | * {{mitem|text=Raster --> Geometric operations --> GeFolki Co-registration}}. | ||
* Define I/O Parameters and Processing Parameters: | * Define I/O Parameters and Processing Parameters: | ||
| Line 13: | Line 16: | ||
* Click {{button|text=Run}}. | * Click {{button|text=Run}}. | ||
* Repeat this step for band_2 ('''subset_1''') and band_3 ('''subset_2'''). Adjust processing parameters for each band, accordingly. | * Repeat this step for band_2 ('''subset_1''') and band_3 ('''subset_2'''). Adjust processing parameters for each band, accordingly. | ||
| + | # Stack single bands to multiband file | ||
* Create a stack of all coregistered single bands. {{mitem|text=Raster --> Geometric operations --> Collocation}} | * Create a stack of all coregistered single bands. {{mitem|text=Raster --> Geometric operations --> Collocation}} | ||
[[File:snap_collocation.png|400px]] | [[File:snap_collocation.png|400px]] | ||
| + | # Convert datatype from float32 to uint8 | ||
* {{mitem|text=Raster --> Data Conversion --> Convert Datatype}} | * {{mitem|text=Raster --> Data Conversion --> Convert Datatype}} | ||
* Check '''Save as''' and select GeoTIFF from drop downlist | * Check '''Save as''' and select GeoTIFF from drop downlist | ||
Revision as of 13:07, 9 November 2020
- Visualize geometric offset
- Start SNAP Desktop
- File --> Open Product.... Browse for Unmanned Aerial System (UAS) ortho mosaics:
\geodata\uas\clip_ebee_ortho_align.tif is a reference image which is very well georeferenced. \geodata\uas\clip_mavic_ortho_align.tif is an image with a positional offset. It needs to be registered to the reference image. Open or drag and drop marked files from Windows File Explorer into the SNAP Product Explorer tab.
- Mark the reference image clip_ebee_ortho_align.tif in ToC. Right click Open RGB Image Window --> OK.
- Mark the image to be registered clip_mavic_ortho_align.tif in ToC. Right click Open RGB Image Window --> OK.
- Window --> Tile Vertically. Both side-by-side windows are spatially linked. Zoom in and use the Panning tool to see the offset between both images
- Split multiband to single band files
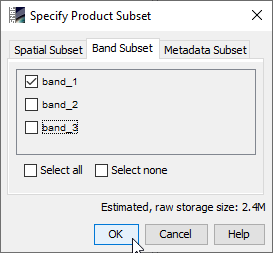
- Mark the image to be registered clip_mavic_ortho_align.tif in ToC. Raster --> Subset --> Band Subset. Check exclusivly band_1.
- Repeat this step for band_2 and band_3 creating separated single bands of the image to be registered .
- Co-registration of single band raster files
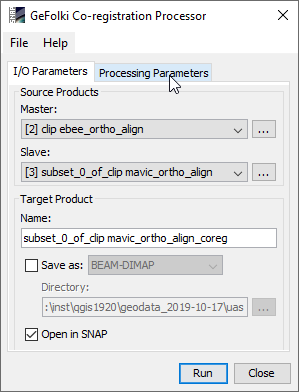
- Raster --> Geometric operations --> GeFolki Co-registration.
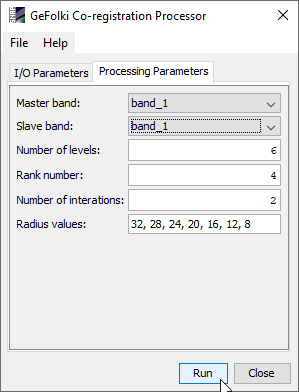
- Define I/O Parameters and Processing Parameters:
- Click Run.
- Repeat this step for band_2 (subset_1) and band_3 (subset_2). Adjust processing parameters for each band, accordingly.
- Stack single bands to multiband file
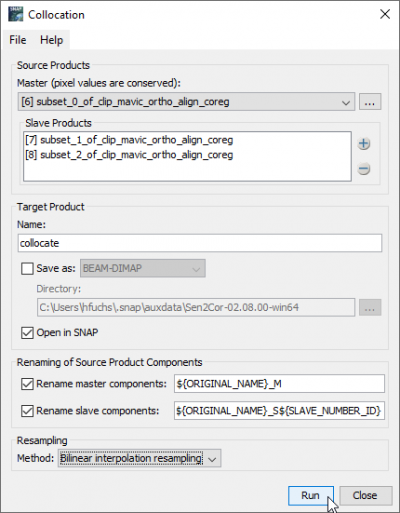
- Create a stack of all coregistered single bands. Raster --> Geometric operations --> Collocation
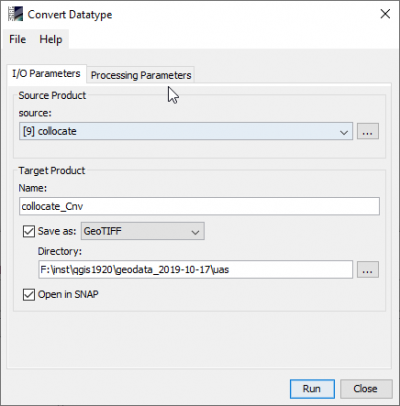
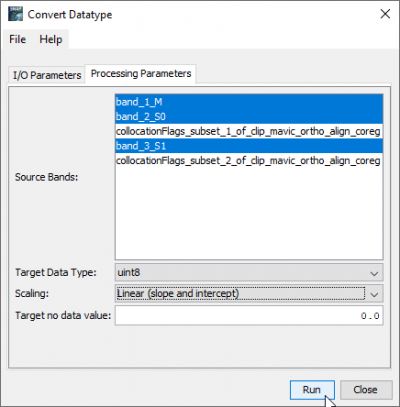
- Convert datatype from float32 to uint8
- Raster --> Data Conversion --> Convert Datatype
- Check Save as and select GeoTIFF from drop downlist
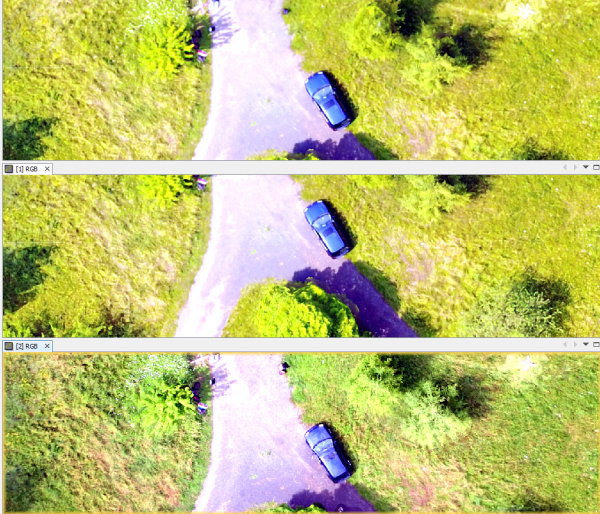
- Mark the coregistered image {{{text}}} in ToC. Right click Open RGB Image Window --> OK. Check the geometric quality of the co-registration comparing clip_ebee_ortho_align.tif (bottom), clip_ebee_ortho_align.tif (middle) and collocate_cnv.tif (top).
