Co-registration with SNAP
From AWF-Wiki
(Difference between revisions)
| Line 4: | Line 4: | ||
* Mark the reference image ''clip_ebee_ortho_align.tif'' in ToC. Right click {{mitem|text= Open RGB Image Window --> OK}}. | * Mark the reference image ''clip_ebee_ortho_align.tif'' in ToC. Right click {{mitem|text= Open RGB Image Window --> OK}}. | ||
* Mark the reference image ''clip_mavic_ortho_align.tif'' in ToC. Right click {{mitem|text= Open RGB Image Window --> OK}}. | * Mark the reference image ''clip_mavic_ortho_align.tif'' in ToC. Right click {{mitem|text= Open RGB Image Window --> OK}}. | ||
| − | * {{mitem|text= Window --> Tile Vertically}}. Both side-by-side windows are spatially linked. Zoom in and use the Panning tool to see the offset between both images | + | * {{mitem|text= Window --> Tile Vertically}}. Both side-by-side windows are spatially linked. Zoom in and use the {{button|text=Panning tool}} to see the offset between both images |
* Mark the image to be registered ''clip_mavic_ortho_align.tif'' in ToC. {{mitem|text=Raster --> Subset --> Band Subset}}. Check exclusivly '''band_1'''. | * Mark the image to be registered ''clip_mavic_ortho_align.tif'' in ToC. {{mitem|text=Raster --> Subset --> Band Subset}}. Check exclusivly '''band_1'''. | ||
Revision as of 11:58, 5 November 2020
- Start SNAP Desktop
- File --> Open Product.... Browse for Unmanned Aerial System (UAS) ortho mosaics:
\geodata\uas\clip_ebee_ortho_align.tif is a reference image which is very well georeferenced. \geodata\uas\clip_mavic_ortho_align.tif is an image with an positional offset. It needs to be registered to the reference image. Open or drag and drop marked files from Windows File Explorer into the SNAP Product Explorer tab.
- Mark the reference image clip_ebee_ortho_align.tif in ToC. Right click Open RGB Image Window --> OK.
- Mark the reference image clip_mavic_ortho_align.tif in ToC. Right click Open RGB Image Window --> OK.
- Window --> Tile Vertically. Both side-by-side windows are spatially linked. Zoom in and use the Panning tool to see the offset between both images
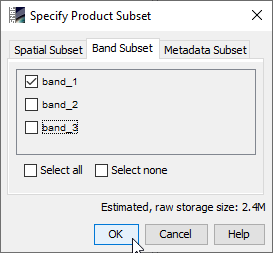
- Mark the image to be registered clip_mavic_ortho_align.tif in ToC. Raster --> Subset --> Band Subset. Check exclusivly band_1.
- Repeat this step for band_2 and band_3 creating separated single bands of the image to be registered .
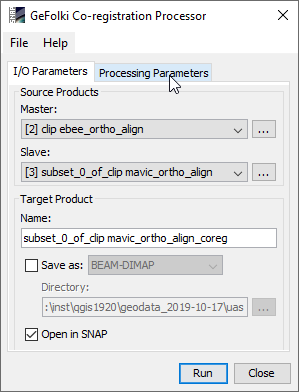
- Raster --> Geometric operations --> GeFolki Co-registration.
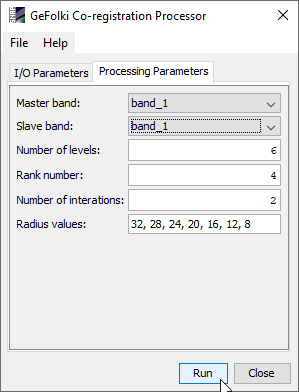
- Define I/O Parameters and Processing Parameters:
- Click Run.
- Repeat this step for band_2 (subset_1) and band_3 (subset_1). Adjust processing parameters for each band, accordingly.
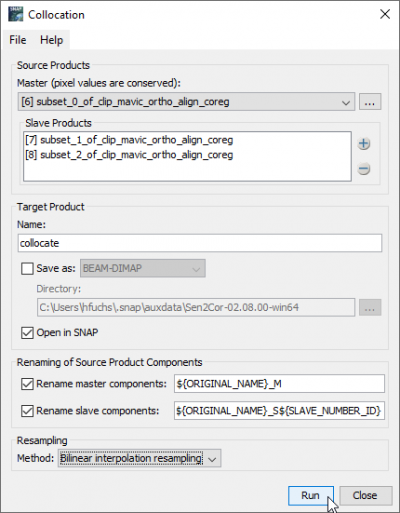
- Create a stack of all coregistered single bands. Raster --> Geometric operations --> Collocation
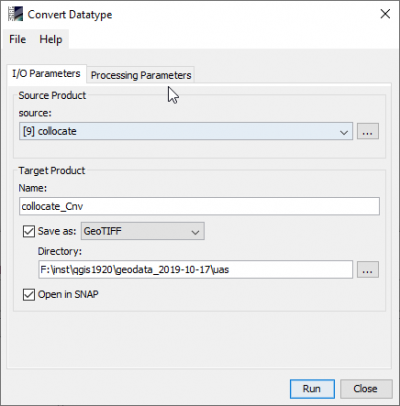
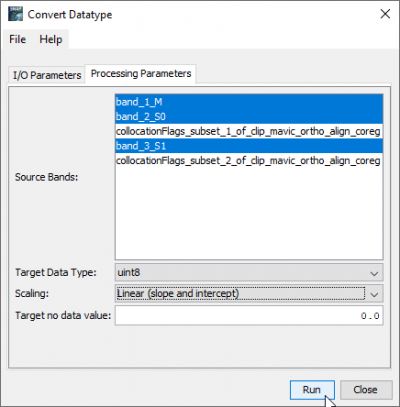
- Raster --> Data Conversion --> Convert Datatype
- Check Save as and select GeoTIFF from drop downlist
- Load clip_ebee_ortho_align.tif, clip_mavic_ortho_align.tif and collocate_Cnv.tif into QGIS and check the geometric quality of the co-registration.
