Radiometric calibration with SNAP
From AWF-Wiki
(Difference between revisions)
| Line 9: | Line 9: | ||
[[File:snap_sen2cor_params.png|400px]] | [[File:snap_sen2cor_params.png|400px]] | ||
* Check '''Display execution execution report''' on. {{button|text=Run...}} | * Check '''Display execution execution report''' on. {{button|text=Run...}} | ||
| − | * Compare | + | * Compare Output Product with Original Product. Mark the Original Product Name in Product Explorer Right Click {{mitem|text=Open RGB Image Window --> Sentinel-2 MSI Natural Colors}}. {{button|text=OK}}. Repeat for the Output Product. |
* {{mitem|text=Window --> Tile horizontally}} | * {{mitem|text=Window --> Tile horizontally}} | ||
* Check {{mitem|text=View --> Sychronize Image Cursors}} and {{mitem|text=View --> Sychronize Image Views}}. Zoom and Pan. | * Check {{mitem|text=View --> Sychronize Image Cursors}} and {{mitem|text=View --> Sychronize Image Views}}. Zoom and Pan. | ||
Revision as of 13:51, 8 November 2019
- Download a Sentinel-2 Level 1C tile from ESA's Copernicus Open Access Hub web service.
- !Unzip the downloaded compressed product file!
- Start SNAP Desktop.
- File --> Open Product.... Browse to the unzipped product folder and open the metadata file MTD_MSIL1C.xml.
- Optical --> Thematic Land Processing --> Sen2Cor Processor --> Sen2Cor 280
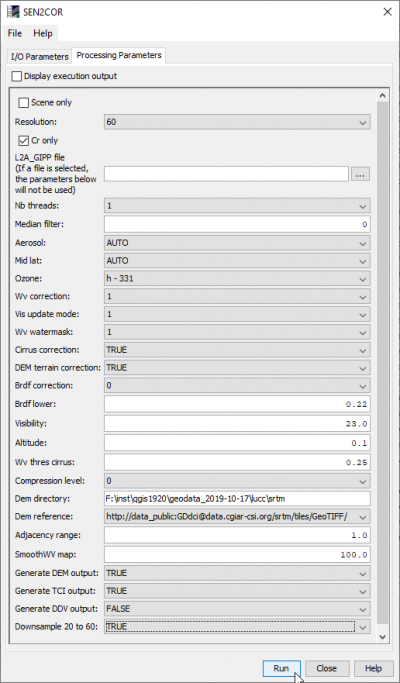
- Specify the Processing Parameters:
A first run will be made with 60m pixel resolution (takes ca. 5-10 Minutes computation)
Topographic normalization is activated with DEM correction: TRUE. For DEM directory specify a folder where dem files are stored.

- Check Display execution execution report on. Run...
- Compare Output Product with Original Product. Mark the Original Product Name in Product Explorer Right Click Open RGB Image Window --> Sentinel-2 MSI Natural Colors. OK. Repeat for the Output Product.
- Window --> Tile horizontally
- Check View --> Sychronize Image Cursors and View --> Sychronize Image Views. Zoom and Pan.
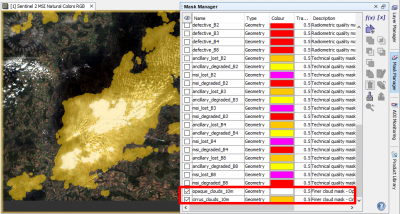
- Activate a map view by clicking into the canvas of the Original Product. Click Mask Manager tab on the right.
- Check the mask layers opaque_clouds and cirrus_clouds in the Mask Manager.
- Click into the map canvas of the Ouput Product. Click Mask Manager tab on the right.
- Check the mask layers scl_cloud_shadow, scl_cloud_medium_proba, scl_cloud_high_proba in the Mask Manager.
- For the second run choose in Processing Parameters Spatial resolution in with 10m pixel resolution Processing Parameters (takes ca. 5-10 Minutes computation)
