The Profile plugin
From AWF-Wiki
(Difference between revisions)
(→Basic use case) |
|||
| (12 intermediate revisions by 4 users not shown) | |||
| Line 1: | Line 1: | ||
| − | |||
The Profile tool plots terrain profiles along interactive pointed lines. It handles one-band | The Profile tool plots terrain profiles along interactive pointed lines. It handles one-band | ||
rasters of any format supported by QGIS. | rasters of any format supported by QGIS. | ||
| − | [[File: | + | After installing and enabling the plugin, you will find the “Terrain profile” button in the plugin toolbar: [[File:qgisprofiletool.png|80px]] |
| − | {{ | + | ==Basic use case== |
| + | # Load the elevation raster in the map canvas. Mark the raster layer in the layers window. | ||
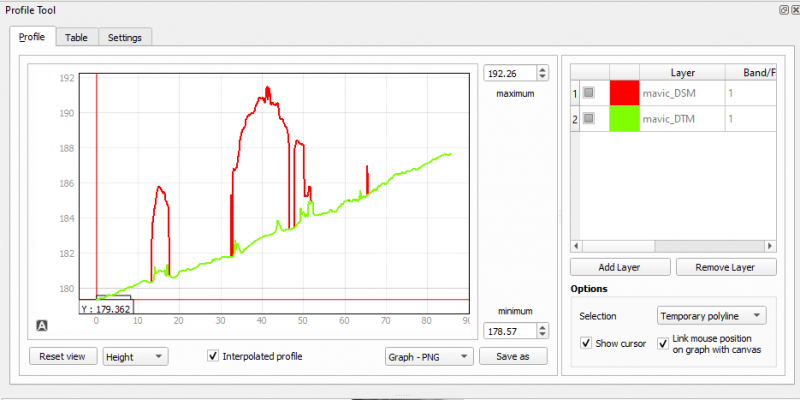
| + | # Press the “Terrain profile” button. This opens the Profile tool panel which consists of a graph area on the left and a raster layer list on the right. | ||
| + | # Click {{button|text= Add Layer} The marked raster layer will be added to the raster layer list. | ||
| + | # Draw a line in the map area. Start with a left click and double-click left to end drawing the line. | ||
| + | # If you want to add another raster layer to the plugin, you need to first select the raster layer in the layers window and then press the “Add Layer” button in the Profile Tool panel. | ||
| + | # Click on the color field of the raster layer in Profile Tool panel to select different colors. | ||
| − | + | [[File:Profile.png|800px]] | |
| − | + | ||
| − | + | ||
| − | + | ||
| − | + | ||
| − | [[Category: | + | ==References== |
| + | <references/> | ||
| + | |||
| + | [[Category:Terrain Analysis]] | ||
Latest revision as of 10:01, 1 February 2021
The Profile tool plots terrain profiles along interactive pointed lines. It handles one-band rasters of any format supported by QGIS.
After installing and enabling the plugin, you will find the “Terrain profile” button in the plugin toolbar: 
[edit] Basic use case
- Load the elevation raster in the map canvas. Mark the raster layer in the layers window.
- Press the “Terrain profile” button. This opens the Profile tool panel which consists of a graph area on the left and a raster layer list on the right.
- Click {{button|text= Add Layer} The marked raster layer will be added to the raster layer list.
- Draw a line in the map area. Start with a left click and double-click left to end drawing the line.
- If you want to add another raster layer to the plugin, you need to first select the raster layer in the layers window and then press the “Add Layer” button in the Profile Tool panel.
- Click on the color field of the raster layer in Profile Tool panel to select different colors.
