Convert vector to raster
From AWF-Wiki
(Difference between revisions)
| (One intermediate revision by one user not shown) | |||
| Line 1: | Line 1: | ||
* Click the {{button|text=Add raster layer}} [[Image:QGIS_2.0_addrast.png|20px]] and select the file ''C:/OSGeo4W64/geodata/raster/s2/Subset_S2A_MSIL2A_20170619T.tif''. | * Click the {{button|text=Add raster layer}} [[Image:QGIS_2.0_addrast.png|20px]] and select the file ''C:/OSGeo4W64/geodata/raster/s2/Subset_S2A_MSIL2A_20170619T.tif''. | ||
* Click {{button|text=Open}}, the raster layer appears on the QGIS canvas. | * Click {{button|text=Open}}, the raster layer appears on the QGIS canvas. | ||
| − | # Click {{button|text=Add vector layer}} [[Image:QGIS_2.0_addvect.png|20px]] and select file ''geodata/vector/Subset-Goe_DE021L1_GOTTINGEN_UA2012_UTM32N_reclass.shp'' containing an integer column indicating the land cover class code. | + | # Click {{button|text=Add vector layer}} [[Image:QGIS_2.0_addvect.png|20px]] and select file ''geodata/vector/Subset-Goe_DE021L1_GOTTINGEN_UA2012_UTM32N_reclass.shp'' containing an integer column indicating the land cover class code (result of [[Conditional field calculator]]). |
* In the search engine of the Processing Toolbox, type Rasterize and select '''Rasterize (vector to Raster)''' under Conversion of GDAL. | * In the search engine of the Processing Toolbox, type Rasterize and select '''Rasterize (vector to Raster)''' under Conversion of GDAL. | ||
* Select the vector file as the input layer. | * Select the vector file as the input layer. | ||
| Line 8: | Line 8: | ||
* Enter 10 as the number of Horizontal pixel size (in meters). | * Enter 10 as the number of Horizontal pixel size (in meters). | ||
* Enter 10 as the number of Vertical pixel size (in meters). | * Enter 10 as the number of Vertical pixel size (in meters). | ||
| − | * As Raster extent click '''Use Layer/Canvas extent''' | + | * As Raster extent click the button {{button|text=...}} and then '''Use Layer/Canvas extent''' to select the loaded raster file (s. above). |
* Unfold the '''Advanced Parameters'''. | * Unfold the '''Advanced Parameters'''. | ||
* Choose '''Byte''' (8bit) as Output Raster Type. | * Choose '''Byte''' (8bit) as Output Raster Type. | ||
Latest revision as of 15:11, 26 November 2017
- Click the Add raster layer
 and select the file C:/OSGeo4W64/geodata/raster/s2/Subset_S2A_MSIL2A_20170619T.tif.
- Click Open, the raster layer appears on the QGIS canvas.
- Click Add vector layer
 and select file geodata/vector/Subset-Goe_DE021L1_GOTTINGEN_UA2012_UTM32N_reclass.shp containing an integer column indicating the land cover class code (result of Conditional field calculator).
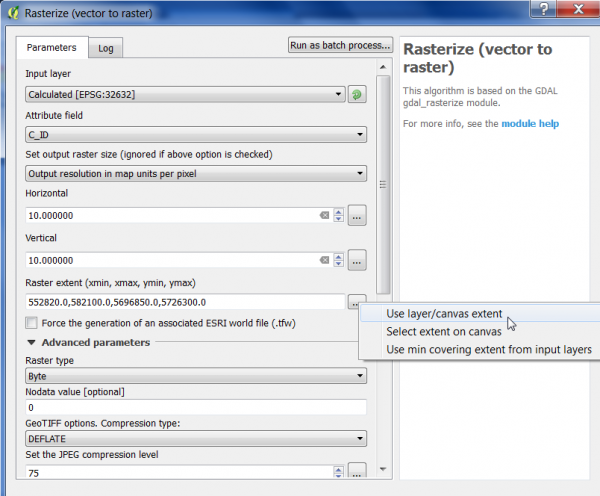
- In the search engine of the Processing Toolbox, type Rasterize and select Rasterize (vector to Raster) under Conversion of GDAL.
- Select the vector file as the input layer.
- Select C_ID as Attribute field containing the integer class code.
- Select Output size form map resolution per pixel from the drop-down list.
- Enter 10 as the number of Horizontal pixel size (in meters).
- Enter 10 as the number of Vertical pixel size (in meters).
- As Raster extent click the button ... and then Use Layer/Canvas extent to select the loaded raster file (s. above).
- Unfold the Advanced Parameters.
- Choose Byte (8bit) as Output Raster Type.
- Type 0 as Nodata Value.
- Specify the directory under Rasterized and name the file C_ID.tif for saving.
- Click on Run to execute the algorithm.
