Creating new vector layers
From AWF-Wiki
(Difference between revisions)
| Line 6: | Line 6: | ||
# Double-click the ''multi_etm'' layer in the legend to oprn the {{button|text=Raster layer properties}} dialog. | # Double-click the ''multi_etm'' layer in the legend to oprn the {{button|text=Raster layer properties}} dialog. | ||
# Create a [[Color composites | false color composite]]. | # Create a [[Color composites | false color composite]]. | ||
| − | #* In the {{button|text=Symbology}} tab change the assignment of RGB to the band | + | #* In the {{button|text=Symbology}} tab change the assignment of RGB to the band numbers to 5-4-2. Change the standard deviation from 0.00 to 2.0 and press {{button|text=apply}} |
# Create a new vector layer. Click {{mitem|text=Layer → New vector layer}}. | # Create a new vector layer. Click {{mitem|text=Layer → New vector layer}}. | ||
# Prepare the following window as shown below. <br> Type: Polygon <br> Type: Integer (whole number) <br> Name: cat <br> Widht: 3 | # Prepare the following window as shown below. <br> Type: Polygon <br> Type: Integer (whole number) <br> Name: cat <br> Widht: 3 | ||
Revision as of 11:45, 14 January 2011
QGIS Tutorial
Category QGIS tutorial not found
- Under Settings Project → Properties set the SRS to the coordinate system GaussKruger Zone 3 (EPSG: 31467).
- Click the Add raster layer in the toolbar or choose Layer → Add raster Layer
- Navigate to ../geodata/multi_etm.tif
- Make sure the “Files of type” drop-down box has the “GeoTiff” filter selected.
- Double-click the multi_etm layer in the legend to oprn the Raster layer properties dialog.
- Create a false color composite.
- In the Symbology tab change the assignment of RGB to the band numbers to 5-4-2. Change the standard deviation from 0.00 to 2.0 and press apply
- Create a new vector layer. Click Layer → New vector layer.
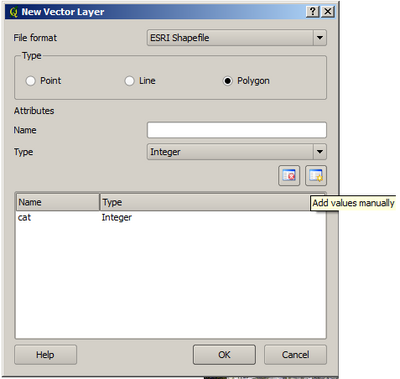
- Prepare the following window as shown below.
Type: Polygon
Type: Integer (whole number)
Name: cat
Widht: 3
You can add additional attributes as columns with the button ![]() . Choose the data “type” of the column (Integer). The values of the attributes can be defined during the digitizing process.
. Choose the data “type” of the column (Integer). The values of the attributes can be defined during the digitizing process.
Save the Layer in your geodata folder, name it train.
