Trimble Juno GPS
From AWF-Wiki
(Difference between revisions)
| (64 intermediate revisions by 3 users not shown) | |||
| Line 1: | Line 1: | ||
| − | {{ | + | {{author|name=[[User:yanti|Yanti Sarodja]]}} |
| − | + | ''In this exercise you'll get an introduction on how to handle a the | |
| + | [[:wikipedia:GPS navigation device|GPS receiver]] ''Trimble Juno 3B'' by [[:wikipedia:Trimble navigation|Trimble navigation]].'' | ||
| + | |||
| + | |||
| + | __TOC__ | ||
| + | |||
| + | ===Overview=== | ||
| + | |||
| + | {| class="Wikitable" | ||
| + | | [[Image:trimble_front.png|thumb|center|x250px|'''Figure A''':''Trimble Juno 3B'' Front view]] | ||
| + | | [[Image:trimble_back.png|thumb|center|x250px|'''Figure B''':''Trimble Juno 3B'' Back view]] | ||
| + | | [[Image:trimble_bottom.png|thumb|center|342px|'''Figure C''':''Trimble Juno 3B'' Back view]] | ||
| + | |} | ||
| − | |||
| − | |||
| − | |||
| − | |||
| − | |||
| − | |||
===Startup and configuration=== | ===Startup and configuration=== | ||
| + | |||
# Press the power button for a few seconds | # Press the power button for a few seconds | ||
| − | # Open the windows menu and select {{mitem|text=TerraSync --> Professional Edition}}. Wait for a few minutes, until you get a connection to at least three satellites. | + | # Open the windows menu (by selecting on screen or pushing the windows-button) and select {{mitem|text=TerraSync --> Professional Edition}}. You are redirected to the {{button|text=Status}} menu, with a skyplot displayed in the center of the screen. Wait for a few minutes, until you get a connection to at least three satellites, which are displayed by little symbols on the skyplot. |
# Set the coordinate system and other parameters | # Set the coordinate system and other parameters | ||
| − | ## To set the coordinate system and other parameters, select {{ | + | ## To set the coordinate system and other parameters, select the upper of the two pull down menus at the top left corner of the screen (right now, {{button|text=Status}} should be displayed here). Select {{button|text=Setup}}. Alternatively, you can select the [[:wikipedia:Wrench|wrench]] symbol to enter the setup menu (see '''figure A'''). |
| − | ## | + | ## Select the {{button|text=Coordinate system}} menu and use these settings: |
| + | ### For this exercise, you can select {{typed|text=Germany}} under {{button|text=System}}, {{typed|text=UTM Zone 32}} as the {{button|text=Zone}} and {{typed|text=WGS 1984}} as the {{button|text=Datum}}. Leave all other configurations as they are. | ||
| + | ### Confirm with {{button|text=Done}}. | ||
| + | ## Select the {{button|text=GNSS Settings}} menu and use these settings: | ||
| + | ### GNSS Receiver Port: COM4: GPS (to change the setting, dropdown the list) | ||
| + | ### DOP Type: PDOP (use default setting) | ||
| + | ### Max HDOP: 99.0 (use default setting) | ||
| + | ### Min SNR: 12.0 (use default setting) | ||
| + | ### Min Elevation: 5.0 (use default setting) | ||
| + | ### NMEA Output: Off (to change the setting, dropdown the list) | ||
| + | ### Confirm with {{button|text=Done}}. | ||
| + | ## Select the {{button|text=Real-time Settings}} menu and use these settings: | ||
| + | ### Choice 1: Integrated SBAS (to change the setting, dropdown the list) | ||
| + | ### Choice 2: Use uncorrected GNSS (to change the setting, dropdown the list) | ||
| + | ### Confirm with {{button|text=Done}}. | ||
| + | ## Select the {{button|text=Logging Settings}} menu and use these settings: | ||
| + | ### Accuracy setting: Horizontal – In the field (to change the setting, click the icon) | ||
| + | ### Point/Vertex Auto-pause Count: None (to change the setting, dropdown the list) | ||
| + | ### Antenna Height: 1.300m (to change the setting, click the icon) | ||
| + | ### Allow Position Update: Confirm (to change the setting, dropdown the list) | ||
| + | ### Confirm End Feature: No (to change the setting, dropdown the list) | ||
| + | ### Filename Prefix: R (use default setting) | ||
| + | ### Waypoint Filename Prefix: W (use default setting) | ||
| + | ### Between Feature Logging; | ||
| + | #### Style: Time (to change the setting, dropdown the list) | ||
| + | #### Interval: Off (to change the setting, dropdown the list) | ||
| + | ### Confirm with {{button|text=Done}}. | ||
| + | |||
| + | {| class="Wikitable" | ||
| + | | [[Image:trimble_start2.png|thumb|center|x250px|'''Figure D''':''Trimble Juno 3B'' Skyplot]] | ||
| + | | [[Image:trimble_gnss.png|thumb|center|x250px|'''Figure E''':''Trimble Juno 3B'' Setup menu]] | ||
| + | |} | ||
===Navigation=== | ===Navigation=== | ||
To find a specific spatial point: | To find a specific spatial point: | ||
# Set the target | # Set the target | ||
| − | ## Select {{ | + | ## Select the upper pull-down menu, which now should display {{button|text=Status}}. Select {{button|text=Data}}, and select {{button|text=Existing file}} from the pulldown menu below. |
| − | ## Select the | + | ## Select the device where the data is stored under {{button|text=Location}}. Some exemplary data is stored under {{button|text=Storage card}}. Select {{button|text=Tree waypoints}} from the displayed file list and click {{button|text=Open}}. Just confirm the dialogue prompting you for the antenna height. A list with wayponints should appear. |
| − | ## Select the point you want to navigate to (e.g. ''Tree01''. | + | ## Select the point you want to navigate to (e.g. ''Tree01''). |
## Click {{mitem|text=Options-->Set Nav Target}} and set the point you selected before. | ## Click {{mitem|text=Options-->Set Nav Target}} and set the point you selected before. | ||
# Set the background map | # Set the background map | ||
| − | ## Select {{ | + | ## Select the upper pulldown menu and {{button|text=Map}}. |
| − | ## Click {{button|text=Layers}} and check | + | ## Click {{button|text=Layers}} and check make sure that {{button|text=Background}} and {{button|text=GNSS trail}} are checked. Select the {{button|text=Background files...}} menu and check the file(s) you want to load. (e.g. {{typed|text=aerial_utm32_WGS84n}}) and confirm with {{button|text=Done}}. The background map should now be displayed (see '''Figure B'''). |
| + | ## To zoom in to your location on the map, select {{mitem|text=Option --> Auto pan to GNSS position}} or {{button|text=Auto pan to selection}} for manual zooming. | ||
| + | ## Your position appears as {{typed|text=x}} and the selected target as flag symbols on the map. | ||
| + | # Navigation to the target: | ||
| + | ## Select {{button|text=Navigation}} from the top-left pulldown menu. | ||
| + | ## Follow the displayed compass and also check the {{button|text=Distance}} field at the bottom-left of the screen. Note that you need to move to get the compass working. | ||
| + | # To add an own ground control point (GCP): | ||
| + | ## Standing at the desired point, select {{button|text=Data}} from the top-left pulldown menu. From the pulldown menu right below, select {{button|text=New}} and enter the name of the point (e.g. ''GCP01''). Confirm by clicking {{button|text=Create}}. Also confirm the antenna-height prompt as it is. | ||
| + | ## In the next menu, sellec {{button|text=Point generic}}. You can add a comment to give the point a label (for simplicity, you may just enter the name again). | ||
| + | ## Before you're done, the spatial data of the ppoint must be updated. In order to do this, first select {{mitem|text=Options --> Logging interval}} and set the interval to 1 second. | ||
| + | ## Click the {{button|text=Log}} button. A counter will appear at the top-right corner of the screen. Wait until it has reached 100 and press {{button|text=Done}}. Confirm with {{button|text=Yes}} and your point is saved. | ||
| + | |||
| + | ===Show the background and shapefile=== | ||
| + | # Click on the top-left dropdown list / Select Navigation / Select Navigate | ||
| + | # Click on the Nav dropdown list / Select Status | ||
| + | # The Skyplot window appears / Check for the satellite and the accuracy received by the devices | ||
| + | # Click on the top-left dropdown list / Select Map | ||
| + | # A new window appears / Select Background Files | ||
| + | # A Background Files window appears, Use this setting | ||
| + | ## Location: Storage Card | ||
| + | ## Thick the check box in front of Show data files | ||
| + | ## Thick the check box in front of pky_re8b_dd (background map) and 14080701a (road and gcp location) | ||
| + | ## Click Done when everything is set | ||
| + | # The background map and the shapefile will appear on the window. Use the dropdown list on the Top-left corner of the window to select, zoom in, zoom out, pan, digitize, or measure | ||
| + | |||
| + | ===Collecting and saving GCPs=== | ||
| + | # Click on the top-left dropdown list / Select Data | ||
| + | # A Create New Data File window appears; Use this setting; | ||
| + | ## File Type: Rover | ||
| + | ## Location: Storage Card (ALWAYS use STORAGE CARD) | ||
| + | ## File name: gcp01 / gcp 02/ gcp 03 / … / gcp12 | ||
| + | ## Dictionary name: Generic | ||
| + | ## Click create (at the bottom-center menu) | ||
| + | # Confirm Antenna height window appears, click OK (use default setting) | ||
| + | # Another window appears, Select/click on the Point_generic, click Log (on the bottom-right menu) | ||
| + | # On the Upper-right menu, a red circle will appear and starts blinking. The blinking represents how many seconds (and measurements) are taken. Wait until at least 120 seconds (2 minutes) (see the arrow on the Right picture) | ||
| + | # While waiting, we can also type a short description of the point in Comment | ||
| + | # Click Done when it finish / Click Yes to save the position / Click Close (on the bottom-right menu) / Click Yes to close the file. Make sure all this procedure has been done to save and close the file completely. | ||
| + | # Describe the exact location where the GCP is taken on the field form (a clue to find the location in the background image). A drawing would be helpful. | ||
| + | |||
| + | Repeat the procedure to collect and save the next GCP. | ||
| + | |||
| + | ALWAYS create a new file for a new GCP. Make sure that one file is use to collect and save only one GCP to avoid any overwrite points. | ||
| + | |||
| + | {| class="Wikitable" | ||
| + | | [[Image:trimble_gcp1.png|thumb|center|x250px|'''Figure F''':''Trimble Juno 3B'' Create new data file]] | ||
| + | | [[Image:trimble_gcp2.png|thumb|center|x250px|'''Figure G''':''Trimble Juno 3B'' Confirm antenna height]] | ||
| + | |- | ||
| + | | [[Image:trimble_gcp3.png|thumb|center|x250px|'''Figure H''':''Trimble Juno 3B'' Collect]] | ||
| + | | [[Image:trimble_gcp4.png|thumb|center|x250px|'''Figure I''':''Trimble Juno 3B'' ]] | ||
| + | |} | ||
| + | |||
| + | === Download GCP files === | ||
| + | # Take out the storage card from the device and connect to your PC using a proper card reader to open and read the data. | ||
| + | # Go to your storage card folder and copy all your GCP files (please note that each GCP contains of 8 files: *.dd, *.gic, *.gip, *.gis, *.giw, *.gix, *.obs, *.obx). We need all these 8 files (for each GCP) for the post processing. | ||
| + | |||
| + | [[Category:Overview on GPS applications]] | ||
Latest revision as of 11:33, 29 October 2014
Author of this article: Yanti Sarodja
In this exercise you'll get an introduction on how to handle a the
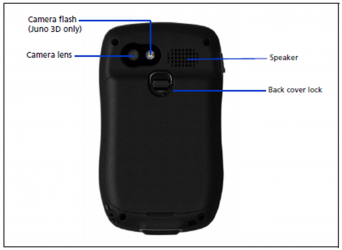
GPS receiver Trimble Juno 3B by Trimble navigation.
Contents |
[edit] Overview
[edit] Startup and configuration
- Press the power button for a few seconds
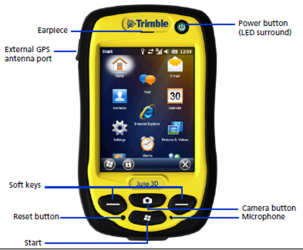
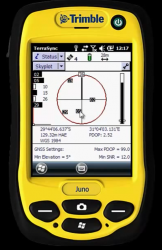
- Open the windows menu (by selecting on screen or pushing the windows-button) and select TerraSync --> Professional Edition. You are redirected to the Status menu, with a skyplot displayed in the center of the screen. Wait for a few minutes, until you get a connection to at least three satellites, which are displayed by little symbols on the skyplot.
- Set the coordinate system and other parameters
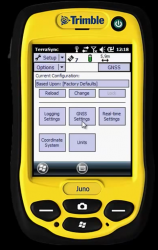
- To set the coordinate system and other parameters, select the upper of the two pull down menus at the top left corner of the screen (right now, Status should be displayed here). Select Setup. Alternatively, you can select the wrench symbol to enter the setup menu (see figure A).
- Select the Coordinate system menu and use these settings:
- For this exercise, you can select Germany under System, UTM Zone 32 as the Zone and WGS 1984 as the Datum. Leave all other configurations as they are.
- Confirm with Done.
- Select the GNSS Settings menu and use these settings:
- GNSS Receiver Port: COM4: GPS (to change the setting, dropdown the list)
- DOP Type: PDOP (use default setting)
- Max HDOP: 99.0 (use default setting)
- Min SNR: 12.0 (use default setting)
- Min Elevation: 5.0 (use default setting)
- NMEA Output: Off (to change the setting, dropdown the list)
- Confirm with Done.
- Select the Real-time Settings menu and use these settings:
- Choice 1: Integrated SBAS (to change the setting, dropdown the list)
- Choice 2: Use uncorrected GNSS (to change the setting, dropdown the list)
- Confirm with Done.
- Select the Logging Settings menu and use these settings:
- Accuracy setting: Horizontal – In the field (to change the setting, click the icon)
- Point/Vertex Auto-pause Count: None (to change the setting, dropdown the list)
- Antenna Height: 1.300m (to change the setting, click the icon)
- Allow Position Update: Confirm (to change the setting, dropdown the list)
- Confirm End Feature: No (to change the setting, dropdown the list)
- Filename Prefix: R (use default setting)
- Waypoint Filename Prefix: W (use default setting)
- Between Feature Logging;
- Style: Time (to change the setting, dropdown the list)
- Interval: Off (to change the setting, dropdown the list)
- Confirm with Done.
[edit]
To find a specific spatial point:
- Set the target
- Select the upper pull-down menu, which now should display Status. Select Data, and select Existing file from the pulldown menu below.
- Select the device where the data is stored under Location. Some exemplary data is stored under Storage card. Select Tree waypoints from the displayed file list and click Open. Just confirm the dialogue prompting you for the antenna height. A list with wayponints should appear.
- Select the point you want to navigate to (e.g. Tree01).
- Click Options-->Set Nav Target and set the point you selected before.
- Set the background map
- Select the upper pulldown menu and Map.
- Click Layers and check make sure that Background and GNSS trail are checked. Select the Background files... menu and check the file(s) you want to load. (e.g. aerial_utm32_WGS84n) and confirm with Done. The background map should now be displayed (see Figure B).
- To zoom in to your location on the map, select Option --> Auto pan to GNSS position or Auto pan to selection for manual zooming.
- Your position appears as x and the selected target as flag symbols on the map.
- Navigation to the target:
- Select Navigation from the top-left pulldown menu.
- Follow the displayed compass and also check the Distance field at the bottom-left of the screen. Note that you need to move to get the compass working.
- To add an own ground control point (GCP):
- Standing at the desired point, select Data from the top-left pulldown menu. From the pulldown menu right below, select New and enter the name of the point (e.g. GCP01). Confirm by clicking Create. Also confirm the antenna-height prompt as it is.
- In the next menu, sellec Point generic. You can add a comment to give the point a label (for simplicity, you may just enter the name again).
- Before you're done, the spatial data of the ppoint must be updated. In order to do this, first select Options --> Logging interval and set the interval to 1 second.
- Click the Log button. A counter will appear at the top-right corner of the screen. Wait until it has reached 100 and press Done. Confirm with Yes and your point is saved.
[edit] Show the background and shapefile
- Click on the top-left dropdown list / Select Navigation / Select Navigate
- Click on the Nav dropdown list / Select Status
- The Skyplot window appears / Check for the satellite and the accuracy received by the devices
- Click on the top-left dropdown list / Select Map
- A new window appears / Select Background Files
- A Background Files window appears, Use this setting
- Location: Storage Card
- Thick the check box in front of Show data files
- Thick the check box in front of pky_re8b_dd (background map) and 14080701a (road and gcp location)
- Click Done when everything is set
- The background map and the shapefile will appear on the window. Use the dropdown list on the Top-left corner of the window to select, zoom in, zoom out, pan, digitize, or measure
[edit] Collecting and saving GCPs
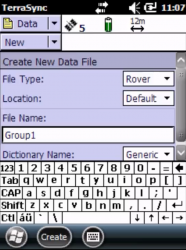
- Click on the top-left dropdown list / Select Data
- A Create New Data File window appears; Use this setting;
- File Type: Rover
- Location: Storage Card (ALWAYS use STORAGE CARD)
- File name: gcp01 / gcp 02/ gcp 03 / … / gcp12
- Dictionary name: Generic
- Click create (at the bottom-center menu)
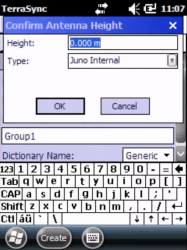
- Confirm Antenna height window appears, click OK (use default setting)
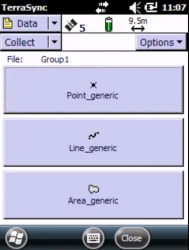
- Another window appears, Select/click on the Point_generic, click Log (on the bottom-right menu)
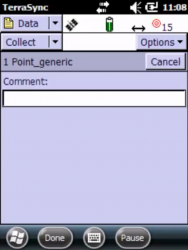
- On the Upper-right menu, a red circle will appear and starts blinking. The blinking represents how many seconds (and measurements) are taken. Wait until at least 120 seconds (2 minutes) (see the arrow on the Right picture)
- While waiting, we can also type a short description of the point in Comment
- Click Done when it finish / Click Yes to save the position / Click Close (on the bottom-right menu) / Click Yes to close the file. Make sure all this procedure has been done to save and close the file completely.
- Describe the exact location where the GCP is taken on the field form (a clue to find the location in the background image). A drawing would be helpful.
Repeat the procedure to collect and save the next GCP.
ALWAYS create a new file for a new GCP. Make sure that one file is use to collect and save only one GCP to avoid any overwrite points.
[edit] Download GCP files
- Take out the storage card from the device and connect to your PC using a proper card reader to open and read the data.
- Go to your storage card folder and copy all your GCP files (please note that each GCP contains of 8 files: *.dd, *.gic, *.gip, *.gis, *.giw, *.gix, *.obs, *.obx). We need all these 8 files (for each GCP) for the post processing.
