Exercise: Measuring point coordinates using WMS Google maps
From AWF-Wiki
Coordinates are often needed for ground control points (GCP) with the objective to georeference remote sensing data or scanned maps without graticule. Google maps can be used as one source for registering point coordinates.
Contents |
- Click
 Add delimeted Text File. Select the input file GBData\GNSS\Festpunkte_Forstbotanischer_Garten.csv. Define X field: East and Y field North. OK. (Fig. A)
 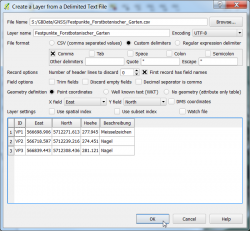 Figure A: Import of point coordinates from a comma separated ASCII file
- Specify the coordinate reference system (CRS) ETRS / UTM zone 32N. Search for the EPSG code: 25832. Three precise geodetic survey points are loaded into the viewer. The current active project CRS is displayed on the lower left frame of the viewer as EPSG:25832.

Use Google maps as background layer
- Activate Web --> Openlayers plugin --> Google Maps --> Google Satellite. A high spatial resolution aerial othophoto originally aqcuired in 2009 by GeoBasis-DE/BKG (Bundesamt für Kartographie und Geodäsie, Frankfurt and provided as web map service (WMS) by Google is displayed in the viewer. Note, the active CRS is automatically changed to EPSG:3857 (WGS84 / Pseudo Mercator).
- Label the geodetic points. Layer --> Properties --> Layer --> Labels. Switch to Show labels for this layer in the drop list and Label with the field ID. Change text size to 12 and text color to white.
- Zoom close in to a geodetic point. What do you notice? The Google layer is misaligned when zooming in to about 1:1000 scale! Find the maximum zoom level where Google layers are still correctly displayed (Fig. B).
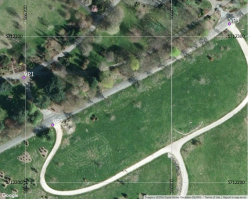 Figure B: Geodetic survey points overlaid on Goggle Satellite layer using Openlayers plugin.

Display GNSS points of a long term measurement before and after differential postprocessing
- Add uncorrected points of a long term measurement using GNSS receiver Trimble GeoExplorer 6000. Layer --> Add layer --> Add vector layer open the shapefile \GBData\GNSS\PosPkt.shp. Zoom in to point VP1 and observe the scattered point cloud. Measure the extent of the GNSS point using the Measure line Tool.
- Now open the GNSS points as a result of a differential postprocessing: Layer --> Add layer --> Add vector layer and open \GBData\GNSS\PosPkt_DGPS.shp. Measure the extent of the postprocessed GNSS point using the Measure line Tool. Which horizontal accuracy can be expected?
Register point coordinates based on Google Maps
- Select Layer --> New --> New Shapefile Layer.
- As layer type, select Point. Click the Specify CRS button and select ETRS89 / UTM zone 32N (EPSG:25832).
- Add a new attibute: type (vpid into the Name field of the New attribute section.
- Select Text data as data type.
- Confirm with Add to attributes list.
- Confirm with OK and enter path and file name (e.g. VP_gm) in the following menu.
- Select the new shapefile in the Layers Panel. Start the edit mode by clicking the Toggle editing button
 .
.
- Zoom in to VP1 (Fixed point marked with "Meisselzeichen") with maximum zoom level where Google layers are still aligned. Click Add feature
 to start digitizing and mark a point with left click and entering the attributes id = 1 and vpid = VP1 in the appearing window.
- Switch off the edit mode of the point layer by clicking the Toggle editing button .
- Vector --> Geometry Tools --> Export/Add geometry columns. Select the vector layer VP_gm and click OK and Yes. Close the dialog with OK and Close.
- Select the VP_gm in the layers panel. Right click Open Attribute table. Report the coordinates XCOORD and YCOORD and calculate the Euclidean distance [meters] to East and North of the precise survey point VP1 in the attribute table Festpunkte_Forstbotanischer_Garten.