Talk:Georeferencing of UAV photos
From AWF-Wiki
(Difference between revisions)
| Line 5: | Line 5: | ||
* Open ''geodata\raster\uav\DJI00857_entzerrt.tif'' in a general image viewer (e.g. MS Windows photo viewer) and rotate the image such that it is correctly oriented to the north direction which facilitates the selection of ground control points. This UAV photo does not contain any information on a spatial reference system. Just press {{button|text=ESC}} to load the image. {{mitem|text=Open Project --> Project Properties}} , choose ''EPSG:3857, WGS 84 / Pseudo Mercator'' and check {{button|text=Enable 'on the fly' CRS transformation}} on. In {{tool|text=Layer panel}} double click on ''DJI00857'' to change the band assignement in {{mitem|text=Layer properties --> Style}} to Red band = Band1, Green Band = Band2 and Blue Band = Band3. The UAV image is shown as a true color composite. | * Open ''geodata\raster\uav\DJI00857_entzerrt.tif'' in a general image viewer (e.g. MS Windows photo viewer) and rotate the image such that it is correctly oriented to the north direction which facilitates the selection of ground control points. This UAV photo does not contain any information on a spatial reference system. Just press {{button|text=ESC}} to load the image. {{mitem|text=Open Project --> Project Properties}} , choose ''EPSG:3857, WGS 84 / Pseudo Mercator'' and check {{button|text=Enable 'on the fly' CRS transformation}} on. In {{tool|text=Layer panel}} double click on ''DJI00857'' to change the band assignement in {{mitem|text=Layer properties --> Style}} to Red band = Band1, Green Band = Band2 and Blue Band = Band3. The UAV image is shown as a true color composite. | ||
| + | |||
| + | * Change the band assignment to RGB = 1,2,3. {{mitem|text=Settings --> Raster Properties --> Style}}. {{button|text=OK}}. | ||
Revision as of 11:53, 3 November 2017
Would be better to create a new page "Organizing your data" ...
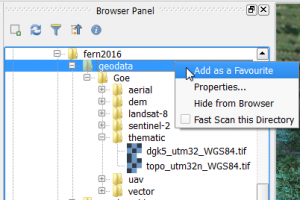
- Right click on the upper part of the main Qgis menu. In the Panel check the box beside the Bowser panel. Drag the Bowser panel window on top of the Layer panel. Browse to your geodata folder where the tutorial data were stored and extracted. Mark geodata and right click Add as a favourite.
 .
.

Double click on topo_utm32_WGS84 to open Layer Properties --> Transparency and change Global transparency to about 70% by moving the slider. Apply.
- Open geodata\raster\uav\DJI00857_entzerrt.tif in a general image viewer (e.g. MS Windows photo viewer) and rotate the image such that it is correctly oriented to the north direction which facilitates the selection of ground control points. This UAV photo does not contain any information on a spatial reference system. Just press ESC to load the image. Open Project --> Project Properties , choose EPSG:3857, WGS 84 / Pseudo Mercator and check Enable 'on the fly' CRS transformation on. In Layer panel double click on DJI00857 to change the band assignement in Layer properties --> Style to Red band = Band1, Green Band = Band2 and Blue Band = Band3. The UAV image is shown as a true color composite.
- Change the band assignment to RGB = 1,2,3. Settings --> Raster Properties --> Style. OK.