Supervised classification (Tutorial)
From AWF-Wiki
(Difference between revisions)
(→Image statistics) |
(→Image statistics) |
||
| Line 1: | Line 1: | ||
= Classification with Orfeo Toolbox = | = Classification with Orfeo Toolbox = | ||
== Image statistics == | == Image statistics == | ||
| − | + | * Type into the search box of the Windows taskbar: {{typed|text=mapla.bat}}. Click on mapla.bat to open Monteverdi Application Launcher. | |
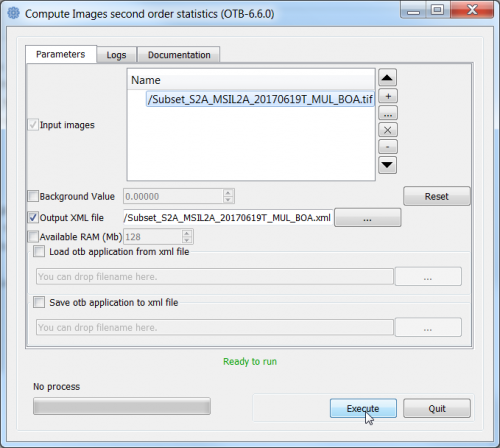
| − | + | * In the search engine of the Processing Toolbox, type {{typed|text=ComputeImagesStatistics}} and double click '''ComputeImagesStatistics'''. | |
| − | + | * Specify a multispectral image as Input Image: the Sentinel-2 image ''Subset_S2A_MSIL2A_20170619T_MUL_BOA.tif '' | |
| − | * | + | * Specify directory and name for the XML Output image. Specify the extension '''.xml''' for this file. |
| − | + | * Click on {{button|text=Execute}}. | |
[[File:Qgis_ComputeImagesStatistics.png|500px]] | [[File:Qgis_ComputeImagesStatistics.png|500px]] | ||
Revision as of 14:52, 2 December 2018
Contents |
Classification with Orfeo Toolbox
Image statistics
- Type into the search box of the Windows taskbar: mapla.bat. Click on mapla.bat to open Monteverdi Application Launcher.
- In the search engine of the Processing Toolbox, type ComputeImagesStatistics and double click ComputeImagesStatistics.
- Specify a multispectral image as Input Image: the Sentinel-2 image Subset_S2A_MSIL2A_20170619T_MUL_BOA.tif
- Specify directory and name for the XML Output image. Specify the extension .xml for this file.
- Click on Execute.
Train image classifier
- Add the training areas as vector polygon file lab05_training_input.shp into QGIS.
- Open Orfeo Toolbox --> TrainImageClassifier (libsvm) to use the Support Vector Machine SVM algorithm (see figure B).
- Set Subset_S2A_MSIL2A_20170619T_MUL_BOA.tif as Input image list.
- Set lab05_training_input.shp as Input vector list.
- Set Subset_S2A_MSIL2A_20170619T_MUL_BOA.tif.xml as Input XML image statistics file.
- Set Name of discrimination field to C_ID (C_ID refers to the column that contains the LUC code).
- Save the Output confusion matrix as ConfusionMatrixSVM.csv.
- Save the Output model as SVM.model.
- Calculation of accuracies :
Open ConfusionMatrixSVM.csv in LibreOffice or MS Excel and calculate overall, producer and consumer accuracies.
Classification
- Open Orfeo Toolbox --> Image Classification (see figure C).
- Set Subset_S2A_MSIL2A_20170619T_MUL_BOA.tif as Input image.
- Set SVM.model as Model file.
- Set Subset_S2A_MSIL2A_20170619T_MUL_BOA.xml as Statistical file.
- Save the Output image as su_svm.tif.
- Evaluate classification results.
- Add the classification result su_svm.tif to QGIS.
- Right click su_svm.tif in the TOC and select Properties --> Style --> Style --> Load Style.
- Load lab05_MinDist.qml.
Compute a confusion matrix with independent reference data
- Open Orfeo Toolbox --> ComputeConfusionMatrix (Vector).
- Set su_svm.tif as Input image.
- Set lab05_validation.shp as Input reference vector data.
- Set Field name to C_ID.
