QGIS installation
Contents |
Using your own laptop or PC
We prefer using Free and Open Source Software because this enables you to install software on your own computer without paying for costly licenses, to learn and continue your work at home. Here are the links to download the software from the internet and install it yourself:
QGIS http://www.qgis.org/en/site/forusers/download.html, available for Windows, Mac OSX, Linux and Android. If you want to follow the exercises of this tutorial on Windows, we recommend following the
Installation Guide for Windows
- Determine if your Windows is 32bit or 64bit Version. Knowing this information is important because you need to choose the right software so its performance can be optimized.
- If you are using Windows 8: On the Start Screen, press Win key (Windows logo key) and the x letter simultanously. Notice the menu of administrative tools in the lower-left corner of the screen, click System and view the information on system type.
- If you are using Windows 7: Press Win key (Windows logo key), Control panel --> System and Security --> System and view the information on system type.
- Download the OSGeo4W Network Installer 32bit for Windows 32-bit or OSGeo4W Network Installer 64bit for Windows 64-bit and save the file into a temporary folder.
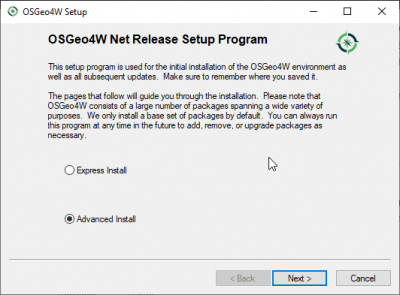
- Start the OSGeo4W Setup Program with a double click the on the downloaded file osgeo4w-setup-x86.exe.
- Choose Advanced Installation. Next.
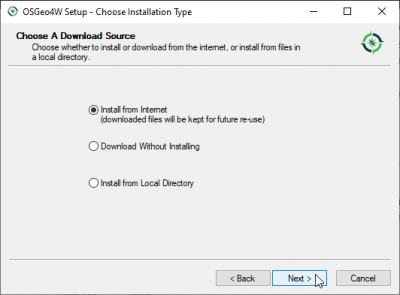
- Choose Install from Internet. Next.
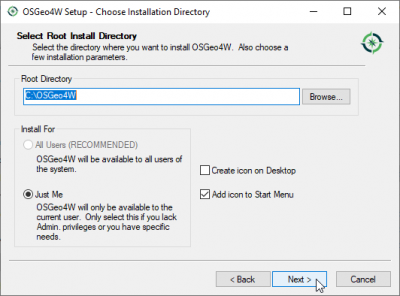
- Set root directory to: C:\OSGeo4W\ and check the radio button All Users. Next.
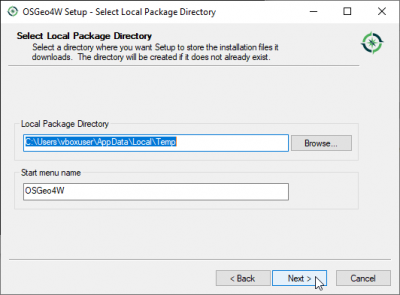
- Choose a temporary directory to store the files to be downloaded. Next.
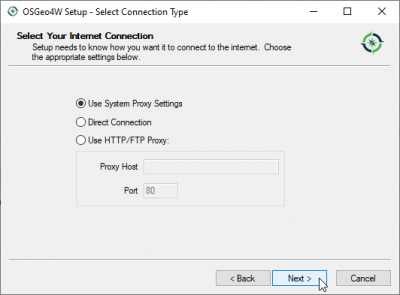
- Choose Internet connection: Direct connection. Next.
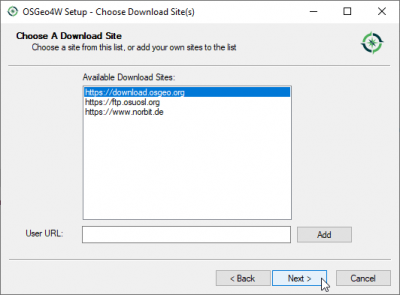
- Accept the default download site.
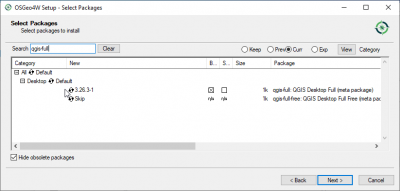
- Select Packages: In the "Categories field" click on the + symbol before "Desktop" to extend the folder. Click on the "Skip" symbol before "qgis-full" to mark necessary software packages for the installation..
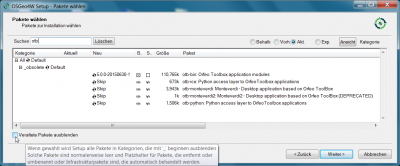
- Install additional packages: Type into the Search field "otb-bin". click on the + symbol before "Libs" to extend the folder. Click on the "Skip" symbol before "otb-bin"..
- Go on and wait until all programs are installed.Next.
- Start QGIS by Start|All programs|OSGeo4W|QGIS Desktop.


 Manually installing SAGA GIS
- Please notice after the last update of the Osgeo4W installer in December 2013 a new version of SAGA 2.0.8-4 is shipped, so you do not need to (but you may) install SAGA 2.1.0 manually from here SAGA 2.1.0 Installer for Windows 32bit or here SAGA 2.1.0 Installer for Windows 64bit. Do not forget to configure the processing toolbox Processing --> Options and configuration --> Providers --> SAGA. In case of using the internal SAGA 2.0.8-4 version click the checkbox "Enable SAGA 2.0.8 compatibility" on and change the SAGA Folder to C:\OSGeo4W\apps\saga. In case of using a manually installed SAGA 2.1.0 click the checkbox "Enable SAGA 2.0.8 compatibility" off and change the SAGA Folder to C:\Program Files\SAGA-GIS'
- Updating QGIS
- Updating QGIS is easily done by using All Programs --> OSGeo4W --> Setup or by double clicking the file C:\OSGeo4W\bin\osgeo4w-setup.exe. Follow the advanced installation procedure. New package versions will be automatically detected. Accept all previous settings and wait until all updated programs are installed.
- Uninstalling QGIS
- To deinstall QGIS you simply delete the installation folder, which is C:\OSGeo4W, the settings folder C:\Users\YourName\.qgis2 and the related icons on the Desktop.
Trying Linux? 
If you are interested to try a Linux OS on your own Windows C, we recommend to install the current distribution of Ubuntu. You can install Ubuntu onto a computer alongside a copy of Windows. You will be able to select whether to start Ubuntu or Windows each time your computer starts up or you can try to run Ubuntu on a CD or even on a memory stick alongside your current system.
Feel free to ask our instructors for guidance!