Configure vector digitization
From AWF-Wiki
(Difference between revisions)
| Line 1: | Line 1: | ||
| + | # Set a metric Project Cordinate reference system {{mitem|text=Project --> Properties --> CRS}}, e.g. WGS84 / UTM zone 32N, EPSG:32632 | ||
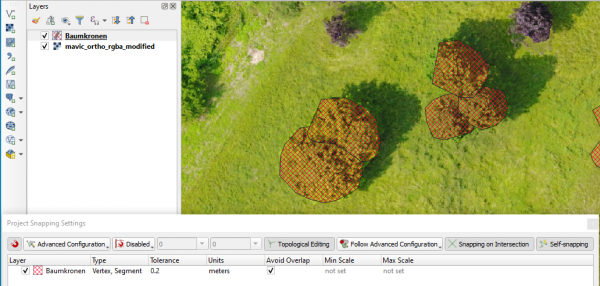
# Select {{mitem|text=Project --> Snapping options}}. | # Select {{mitem|text=Project --> Snapping options}}. | ||
# Activate Snapping clicking on the left button. | # Activate Snapping clicking on the left button. | ||
# Change {{button|text=All Layers}} to {{button|text=Advanced Configuration}} | # Change {{button|text=All Layers}} to {{button|text=Advanced Configuration}} | ||
# Activate one or several vector layers for which you wish to configure snapping. | # Activate one or several vector layers for which you wish to configure snapping. | ||
| − | # | + | # In the dorpdown list '''Type''' activate {{button|text=vertex}} and {{button|text=segment}}. |
# Choose '''Units''' {{button|text=meters}}. | # Choose '''Units''' {{button|text=meters}}. | ||
# Select the snapping '''Tolerance''' {{typed|text=0.2}}. | # Select the snapping '''Tolerance''' {{typed|text=0.2}}. | ||
Revision as of 11:45, 7 June 2021
- Set a metric Project Cordinate reference system Project --> Properties --> CRS, e.g. WGS84 / UTM zone 32N, EPSG:32632
- Select Project --> Snapping options.
- Activate Snapping clicking on the left button.
- Change All Layers to Advanced Configuration
- Activate one or several vector layers for which you wish to configure snapping.
- In the dorpdown list Type activate vertex and segment.
- Choose Units meters.
- Select the snapping Tolerance 0.2.
- Activate the checkbox Avoid overlap.
- Activate Topological Editing and Snapping on Intersection
