Changing pixel size
From AWF-Wiki
(Difference between revisions)
| Line 3: | Line 3: | ||
# In the processing toolbar, type {{typed|text=Resampling}} into the search field to find the {{button|text=SAGA --> Raster Tools --> Resampling}} tool. Open it with a double click. | # In the processing toolbar, type {{typed|text=Resampling}} into the search field to find the {{button|text=SAGA --> Raster Tools --> Resampling}} tool. Open it with a double click. | ||
# For producing larger pixels (100m) we use settings as shown in the screenshot below: | # For producing larger pixels (100m) we use settings as shown in the screenshot below: | ||
| − | [[File:Qgis_downscaling.png|600px]] | + | [[File:Qgis_downscaling.png|600px]] Click {{button|text=Run}}. |
| − | Click {{button|text=Run}}. | + | # The temporary OUTPUT file may be saved on disk with right click on OUTPUT, {{mitem|text=Export --> Save as...}} |
| + | |||
[[Category:Working with Raster Data]] | [[Category:Working with Raster Data]] | ||
Revision as of 11:38, 13 May 2020
Often we need to change the pixel size (or spatial resolution) of a raster layer without changing the extent. The result of Up-sampling (or downscaling) are smaller pixels the result of Down-sampling (or upscaling) are larger pixels.
- Click the Add raster layer
 and select a single band file /geodata_w01/split_S2B_MSIL2A_20190724T103029_N0213_R108_T32UNC_UNB_UPC_1.tif. This is the spectral green band with a pixel size of 10m.
- In the processing toolbar, type Resampling into the search field to find the SAGA --> Raster Tools --> Resampling tool. Open it with a double click.
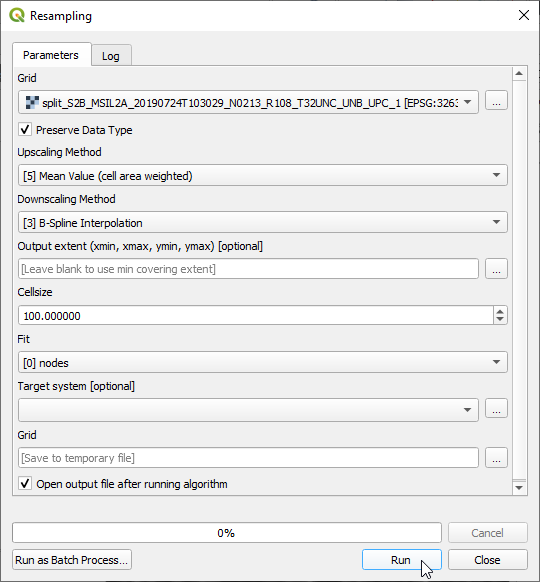
- For producing larger pixels (100m) we use settings as shown in the screenshot below:
- The temporary OUTPUT file may be saved on disk with right click on OUTPUT, Export --> Save as...
