Talk:Training data selection (SCP)
From AWF-Wiki
Creating systematic sampling grid
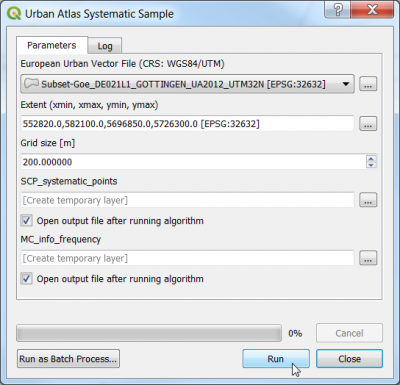
- A processing toolbox model can downloaded from Stud.IP urban_atlas_systematic_sample.model3 or by right click on here and Save file as ...
- Open QGIS and go to the Processing Toolbox; if the Toolbox is not opened click Processing --> Toolbox to activate it.
- In the processing toolbar click Options
 . In the General tab choose "ignor invalid features with invalid geoemtries".
- Go to
 Models --> Open existing models and load the previously downloaded model. The model should appear in the Models tab. Double click on it to execute.
- Specify the European Urban Atlas Vector File layer for Göttingen: \lucc\DE021L1_GOTTINGEN\Subset-Goe_DE021L1_GOTTINGEN_UA2012_UTM32N.shp or download data from other European cities. The original European Urban Atlas data have the spatial reference system EPSG:3035 (ETRS89, LAEA). The Goettingen Urban Atlas file is already transformed to WGS84 /UTM 32. There might occur geometry errors: Run Processing Toolbox --> Check validitiy and Processing Toolbox --> Fix geometries repairing invalid vector geometries.
- Project --> Project Properties --> CRS. Check that the Project spatial reference system is set to EPSG:32632.
- Click Run
Stratified random sampling
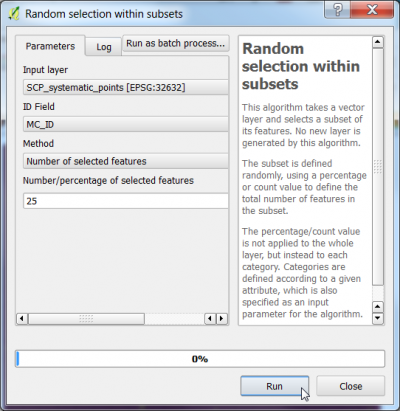
- Vector --> Research Tools --> Random selection within subsets
- The input layer is SCP_systematic_points
- ID Field containing the code for the strata is MC_ID
- Method is equal Number of selected features in each stratum.
- Number of selected features type 25.
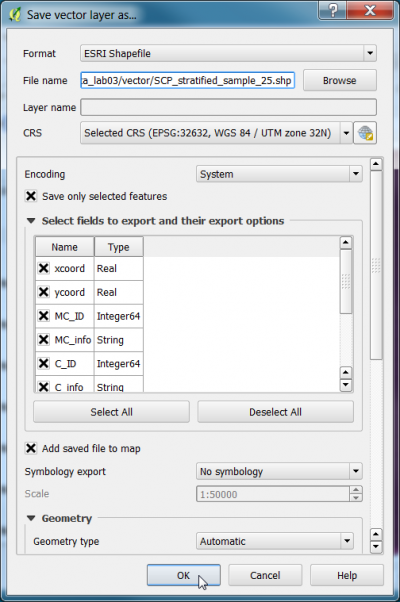
The module selects a subset of the layer SCP_systematic_points. The selected points need to be saved as an ESRI shapefile. Right click on the layer SCP_systematic_points, Save as.... Make sure to check the box: 'Save selected only..as shown below.
Interpretation of selected points
Prepare main QGIS map viewer:
- Install the Openlayers and the Go2nextFeature3 plugin (if not yet done) Plugins --> Manage and Install Plugins --> Install.
- Load the multiband Sentinel-2 satellite image Subset_S2A_MSIL2A_20170619T_MUL.tif.
- Create a false-color composite (RGB = 9-7-3). Set the Layer Properies --> Transparency --> Global Transparency to 50%.
- Load the comma separated ACII file with stratified sample points: click
 Data Source Manger --> Delimited Text. Select the input file CE_2020-01-03.csv. Define X field: XCoordinat and Y field: YCoordinat. Coordinate Reference System (CRS) is EPSG:4326 - WGS84. OK.
- Load Google maps as background WMS layer
- In Layers panel drag the Sentinel-2 image on top of Google Satellite.
- Drag the sample points vector file on top of all other files.
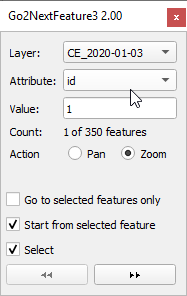
- Activate Plugins -->Go 2 next feature.
- Layer is the sample points.
- The Attribute is id.
- Click the checkbox Select on.
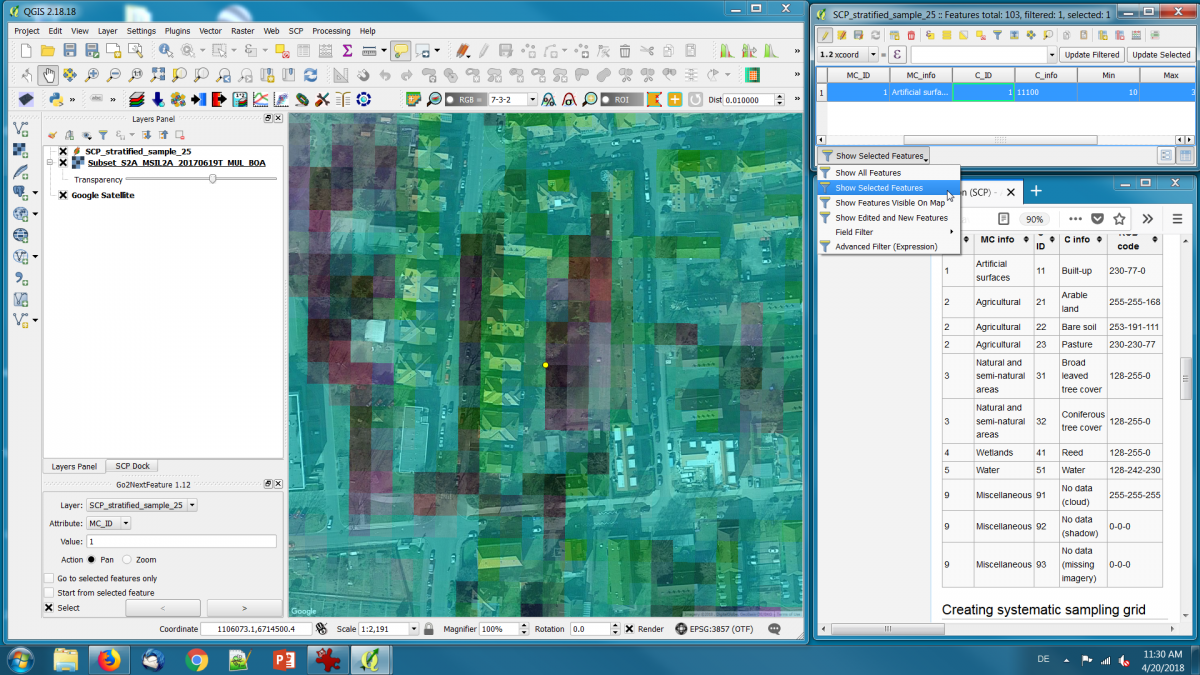
- In Layers panel right click on the sample point layer and Open Attribute Table.
- On the lower left of the Attribute Table switch from Show All Features to Show Selected Features.
- Start the edit mode of the point layer by clicking the Toggle editing button
 .
.
- Arrange the windows on your Desktop as shown below.
- Enter the interpreted land cover class in column valid_cl of the Attribute Table.
- Do not forget to click Save edits button
 .
.
- To stop the edit mode of the point layer click the Toggle editing button
 again.
- Export the file in format csv. Mark layer name in Layers Window. Right click Export --> Save Features as.... Choose file format Comma Separated Value.

