Principal component analysis
From AWF-Wiki
(Difference between revisions)
(→Using QGIS OTB plugin) |
(→Using QGIS OTB plugin) |
||
| Line 7: | Line 7: | ||
* Untick output file after running algorithm (inverse output image) option. | * Untick output file after running algorithm (inverse output image) option. | ||
* Click on {{button|text=Run}} to execute the algorithm. | * Click on {{button|text=Run}} to execute the algorithm. | ||
| + | [[File:qgis_otb_pca.png|400px]] | ||
= Using OTB standalone = | = Using OTB standalone = | ||
Revision as of 13:32, 16 November 2019
Using QGIS OTB plugin
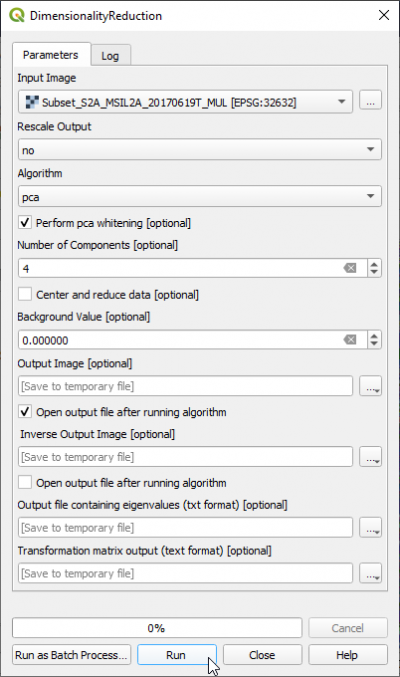
- In the search engine of the Processing Toolbox, type PCA and select DimensionalityReduction under Image Filtering of the Orfeo Toolbox.
- Under the Parameter tab, select Multispectral band file as the input layer.
- Select pca under the Algorithm tab.
- Enter 4 as the number of components.
- Specify the directory to save the output file.
- Untick output file after running algorithm (inverse output image) option.
- Click on Run to execute the algorithm.
Using OTB standalone
- Type into the search box of the Windows taskbar: mapla.bat. Click on mapla.bat to open Monteverdi Application Launcher.
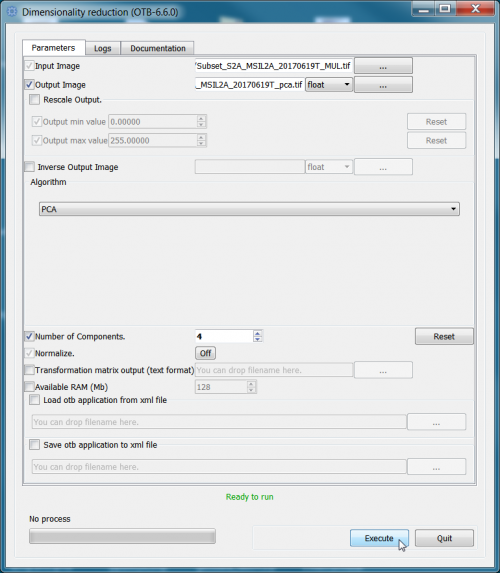
- In the search engine of Mapla, type Dimension and double click Dimensionality Reduction.
- Specify a multispectral image as Input Image.
- Specify directory and name for the Output image. Select the output data type float from the pull-down list.
- Select PCA from the drop-down list as Algorithm.
- Enter 4 as number of components.
- Click on Execute.


