Spatial subset
From AWF-Wiki
(Difference between revisions)
(→Interactive box selection) |
|||
| Line 2: | Line 2: | ||
# Click the {{button|text=Open Data Source Manager}} [[Image:QGIS_3.0_datasource.png|30px]] and {{button|text=Add raster layer}} [[Image:QGIS_2.0_addrast.png|20px]] and select the file ''/geodata/raster/s2/Subset_S2A_MSIL2A_20170619T_MUL.tif''. | # Click the {{button|text=Open Data Source Manager}} [[Image:QGIS_3.0_datasource.png|30px]] and {{button|text=Add raster layer}} [[Image:QGIS_2.0_addrast.png|20px]] and select the file ''/geodata/raster/s2/Subset_S2A_MSIL2A_20170619T_MUL.tif''. | ||
# {{mitem|text=Raster --> Extraction ---> Clip Raster by Extent}} | # {{mitem|text=Raster --> Extraction ---> Clip Raster by Extent}} | ||
| − | # Input file (raster): Choose a loaded file | + | # Input file (raster): Choose a loaded file from the drop down list or click {{button|text=Select}} to browse for a file. |
# Output file: click {{button|text=Select}} to choose a new file name for the subset image. | # Output file: click {{button|text=Select}} to choose a new file name for the subset image. | ||
| − | # | + | # Define the clipping extent by clicking{{button|text=...}} and '''Select extent from canvas''' The clipping mode is now active. Hold a left click on the map canvas dragging a box of your region of interest. |
| − | # Adjust the extent coordinates in the text file rounding the coordinates upper left lower right | + | # Adjust the extent coordinates in the text file rounding the coordinates (upper left and lower right). |
[[File:Qgis_raster_clipper.png|600px]] | [[File:Qgis_raster_clipper.png|600px]] | ||
# Click {{button|text=OK}}. | # Click {{button|text=OK}}. | ||
Revision as of 10:04, 22 October 2018
Interactive box selection
- Click the Open Data Source Manager
 and Add raster layer
  and select the file /geodata/raster/s2/Subset_S2A_MSIL2A_20170619T_MUL.tif.
- Raster --> Extraction ---> Clip Raster by Extent
- Input file (raster): Choose a loaded file from the drop down list or click Select to browse for a file.
- Output file: click Select to choose a new file name for the subset image.
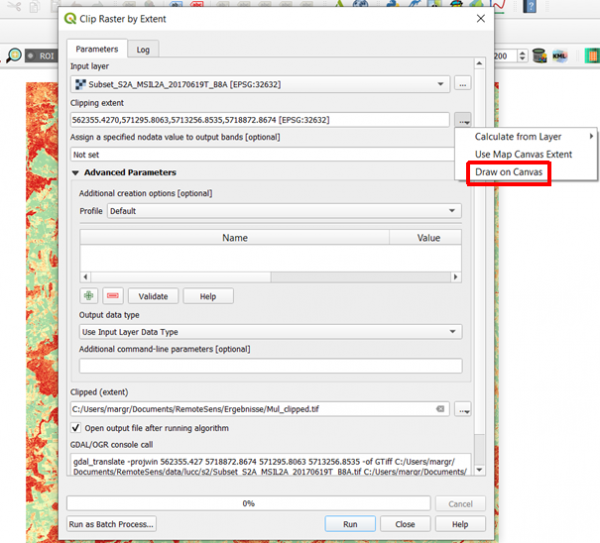
- Define the clipping extent by clicking... and Select extent from canvas The clipping mode is now active. Hold a left click on the map canvas dragging a box of your region of interest.
- Adjust the extent coordinates in the text file rounding the coordinates (upper left and lower right).
- Click OK.
Vector polygon masking
- Load the vector file \geodata\vector\gadm36_DEU_4.shp. These are the level 4 administrative boundaries of the country Germany downloaded from https://gadm.org/index.html .
- Right click on Layer name in the Layers PanelProperties --> General. Change the Data source encoding from System to UTF-8. Click UTF-8.
- Right click on Layer name in the Layers Panel and open the Attribute table.
- Click
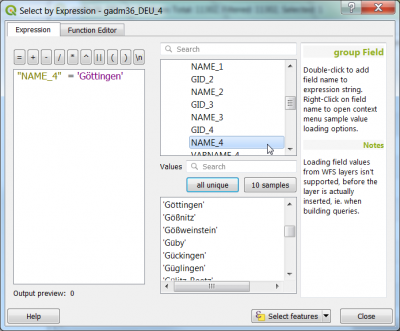
 and select by the expression: "NAME_4" ='Göttingen'. Select.
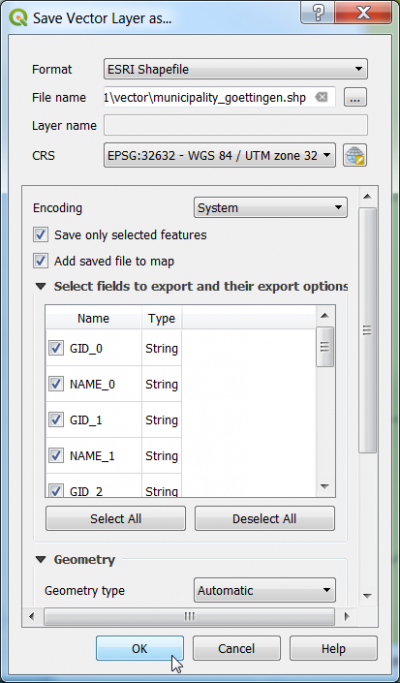
- Right click on Layer name in the Layers Panel Save as.... Fill the form as shown below.
 Make sure that the CRS is the same like the image file (here EPSG:32632)!
- Click Run.
- Raster --> Extraction ---> Clip Raster by Mask Layer...
- Input file (raster): Choose a loaded file name fron the drop down list or click Select to browse to a file (see above).
- Output file: click Select to choose a new file name for the subset image.
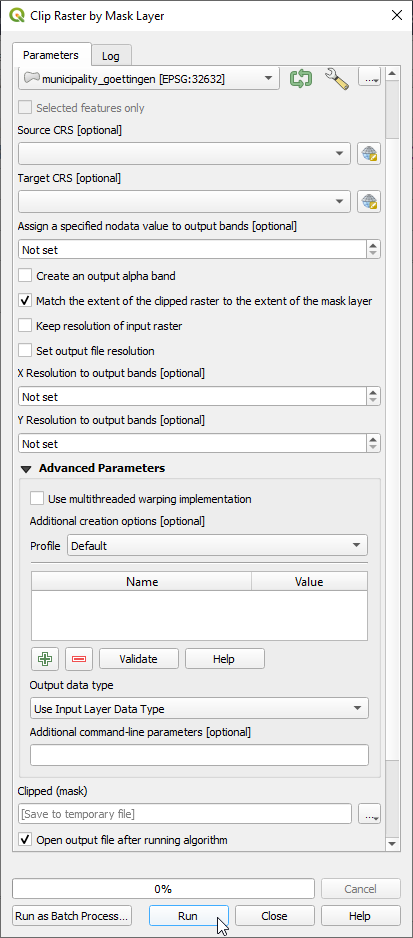
- Change the clipping mode from Extent to Mask. Choose the newly created polygon of the municipality as Mask Layer.
- Switch the checkbox on: Crop the extent of the target dataset to the extent of the cutline. All image data outside the polygon will be masked.
- Switch the No data value checkbox on and specify the value 0.
- Click OK.


