The Profile plugin
From AWF-Wiki
(Difference between revisions)
| Line 3: | Line 3: | ||
rasters of any format supported by QGIS. | rasters of any format supported by QGIS. | ||
| − | After installing and enabling the plugin, you will find the “Terrain profile” button in the plugin toolbar: [[File:qgisprofiletool.png]] | + | After installing and enabling the plugin, you will find the “Terrain profile” button in the plugin toolbar: [[File:qgisprofiletool.png|80px]] |
==Basic use case== | ==Basic use case== | ||
| Line 11: | Line 11: | ||
# After you have finished drawing the line, the graph area will update and display the profile | # After you have finished drawing the line, the graph area will update and display the profile | ||
| − | [[File:Profile.png]] | + | [[File:Profile.png|400px]] |
[[Category:Terrain Analysis]] | [[Category:Terrain Analysis]] | ||
Revision as of 10:15, 29 October 2017
The Profile tool plots terrain profiles along interactive pointed lines. It handles one-band rasters of any format supported by QGIS.
After installing and enabling the plugin, you will find the “Terrain profile” button in the plugin toolbar: 
Basic use case
- Load the elevation raster and select this raster layer in the layer list.
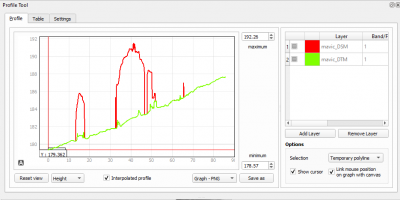
- Press the “Terrain profile” button. This opens the plugin panel which consists of a graph area on the left and a raster layer list on the right. The raster layer you had selected will be added to the raster layer list. If you have “Selection: Temporary polyline” enabled, you can now draw a line in the map area.
- Double-click left to end drawing the line.
- After you have finished drawing the line, the graph area will update and display the profile
