Spatial subset
From AWF-Wiki
(Difference between revisions)
(→Interactice box selection) |
(→Vector Polygon) |
||
| Line 20: | Line 20: | ||
Make sure that the CRS is the same like the image file. | Make sure that the CRS is the same like the image file. | ||
# Click {{button|text=Run}}. | # Click {{button|text=Run}}. | ||
| − | + | # {{mitem|text=Raster --> Extraction ---> Clipper...}} | |
| − | + | # Input file (raster): Choose a loaded file name fron the drop down list or click {{button|text=Select}} to browse to a file (see above). | |
| + | # Output file: click {{button|text=Select}} to choose a new file name for the subset image. | ||
| + | # Change the clipping mode '''Extent''' to '''Mask'''. Hold a left click on the map canvas dragging a box of your region of interest. | ||
| + | # Choose the newly created polygon of the municipality as '''Mask Layer'''. | ||
| + | # Switch the checkbox on: '''Crop the extent of the target dataset to the extent of the cutline'''. All image data outside the polygon will be masked. | ||
| + | # Switch the '''No data value'' checkbox on. | ||
| + | # Click {{button|text=OK}}. | ||
| + | [[File:Qgis_raster_mask.png|400px]] | ||
[[Category: Working with Raster Data]] | [[Category: Working with Raster Data]] | ||
Revision as of 16:17, 25 October 2017
Interactive box selection
- Click the Add raster layer
 and select the file C:/OSGeo4W64/geodata/raster/s2/Subset_S2A_MSIL2A_20170619T.tif.
- After clicking Open, the raster layer appears on the QGIS canvas.
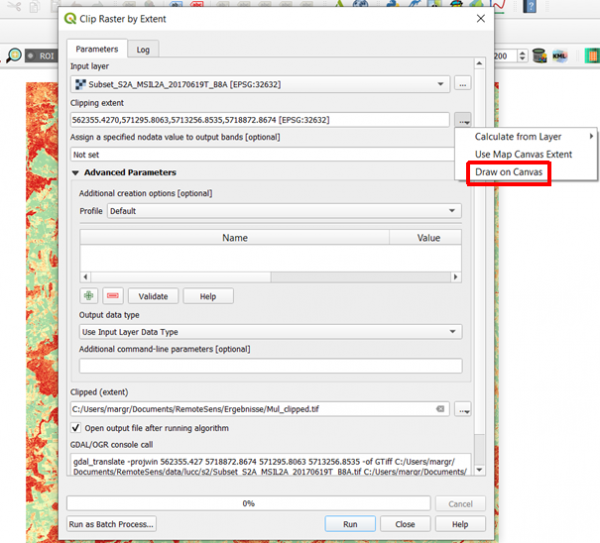
- Raster --> Extraction ---> Clipper...
- Input file (raster): Choose a loaded file name fron the drop down list or click Select to browse to a file.
- Output file: click Select to choose a new file name for the subset image.
- The clipping mode is now already active. Hold a left click on the map canvas dragging a box of your region of interest.
- Adjust the extent coordinates in the text file rounding the coordinates of 1 (upper left corner) x, y and 2 (lower right corner) x, y.
- Click OK.
Vector Polygon
- Load the vector file C:\OSGeo4W64\var\geodata\vector\Landkreis_Goe_neu_utm32.shp. This is the actual boundary of the county Göttingen. We create a new vecto file with the boundary of the municipality Göttingen.
- Right click on Layer name in the Layers PanelProperties --> General. Change the Data source encoding from System to UTF-8. Click UTF-8.
- Right click on Layer name in the Layers Panel and open the Attribute table.
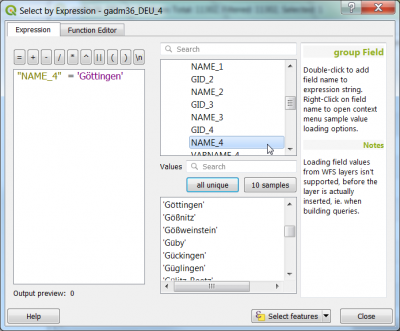
- Click
 and select by the expression: "NAME_4" ='Göttingen'. Select.
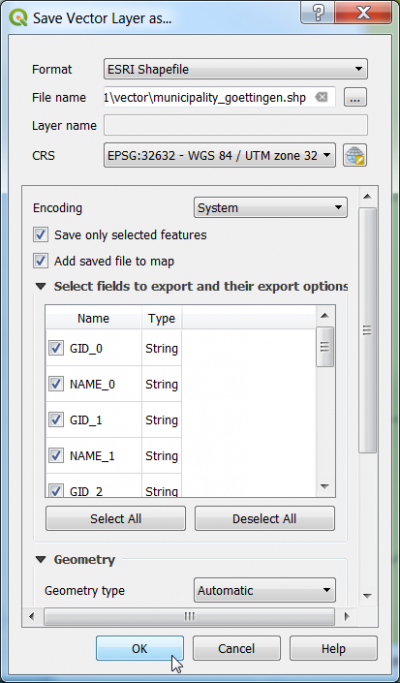
- Right click on Layer name in the Layers Panel Save as.... Fill the form as shown below.
 Make sure that the CRS is the same like the image file.
- Click Run.
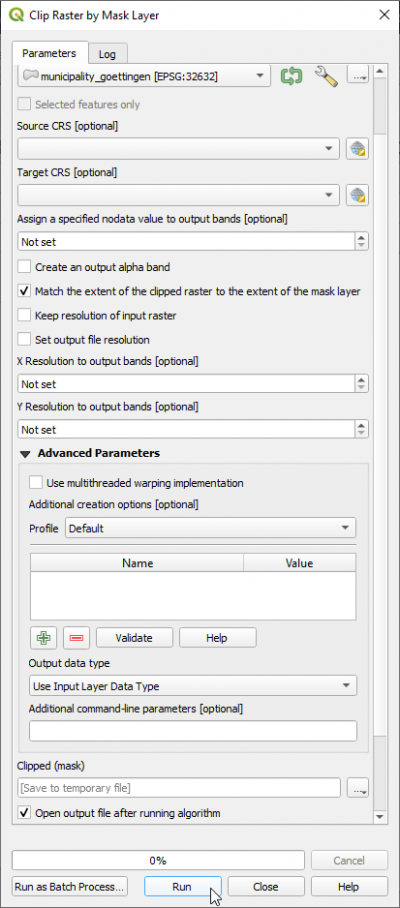
- Raster --> Extraction ---> Clipper...
- Input file (raster): Choose a loaded file name fron the drop down list or click Select to browse to a file (see above).
- Output file: click Select to choose a new file name for the subset image.
- Change the clipping mode Extent to Mask. Hold a left click on the map canvas dragging a box of your region of interest.
- Choose the newly created polygon of the municipality as Mask Layer.
- Switch the checkbox on: Crop the extent of the target dataset to the extent of the cutline. All image data outside the polygon will be masked.
- Switch the 'No data value checkbox on.
- Click OK.


