Create stack
From AWF-Wiki
(Difference between revisions)
(→Build a virtual stack) |
(→Create a multiband raster file (single bands to multiband)) |
||
| Line 10: | Line 10: | ||
== Create a multiband raster file (single bands to multiband) == | == Create a multiband raster file (single bands to multiband) == | ||
A multiband file stores several single raster layers in one file. | A multiband file stores several single raster layers in one file. | ||
| − | + | # Click {{mitem|text=Raster --> Miscellaneous --> Merge}}. | |
| + | # Input files: Click {{button|text=Select}} and choose several single band raster files by holding Strg + left click. Take care on the order of the file selection: it determines the rank of bands in the resulting multiband file. | ||
| + | # Output file: Click {{button|text=Select}} and choose a new file name. | ||
| + | # Click the checkbox '''Place each input band in a separate band''' on (see screenshot below). | ||
| + | [[File:Qgis_merge_raster.png|400px]] | ||
| + | # Click {{button|text=OK}} | ||
[[Category: Working with Raster Data]] | [[Category: Working with Raster Data]] | ||
Revision as of 10:39, 25 October 2017
Build a virtual stack
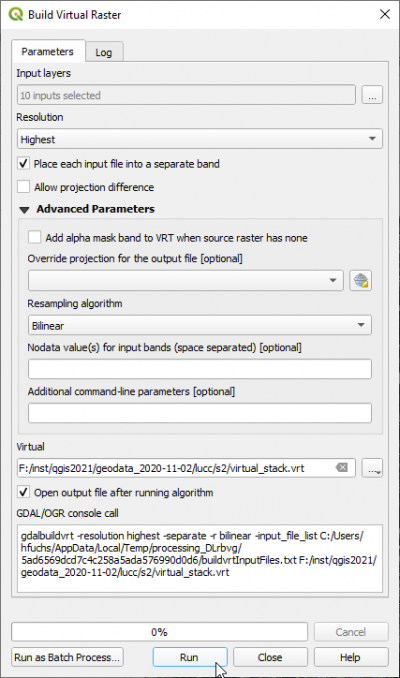
A VRT (Virtual Dataset) is a list of links to input raster datasets. This has the advantage that no additional physical copy of the original files is necessary which saves storage place.
- Click Raster --> Miscellaneous --> Build Virtual Raster (Catalog).
- Input files: Click Select and choose several single band raster files by holding Strg + left click. Take care on the order of the file selection: it determines the rank of bands in the resulting multiband file.
- Output file: Click Select and choose a new file name.
- Click the checkbox -separate on (see screenshot below).
- Click OK
Create a multiband raster file (single bands to multiband)
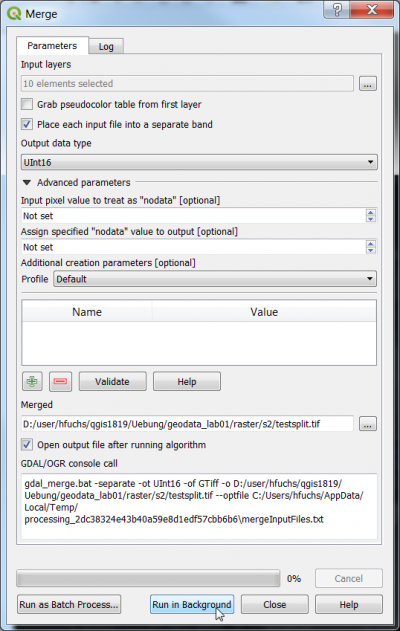
A multiband file stores several single raster layers in one file.
- Click Raster --> Miscellaneous --> Merge.
- Input files: Click Select and choose several single band raster files by holding Strg + left click. Take care on the order of the file selection: it determines the rank of bands in the resulting multiband file.
- Output file: Click Select and choose a new file name.
- Click the checkbox Place each input band in a separate band on (see screenshot below).
- Click OK

