Spectral indices
From AWF-Wiki
(Difference between revisions)
(→Spectral indices using OTB) |
(→Spectral indices using OTB) |
||
| Line 13: | Line 13: | ||
== Spectral indices using OTB == | == Spectral indices using OTB == | ||
| − | A convenient module for calculating spectral indices can be found in the processing toolbar. Type {{typed|text=Radiometric}} into the search field and find the {{button|text=Orfeo Toolbox --> Feature Extraction --> Radiometric Indices)}} tool. Open it with a double click. | + | A convenient module for calculating spectral indices can be found in the QGIS processing toolbar. Type {{typed|text=Radiometric}} into the search field and find the {{button|text=Orfeo Toolbox --> Feature Extraction --> Radiometric Indices)}} tool. Open it with a double click. |
Assign the spectral ranges to the right order of bands in the multiband file. Choose ndvi from the ''Available Radiometric Indices'' drop-down list. {{button|text=OK}}. | Assign the spectral ranges to the right order of bands in the multiband file. Choose ndvi from the ''Available Radiometric Indices'' drop-down list. {{button|text=OK}}. | ||
[[File:Qgis_radio_index.png|400px]] | [[File:Qgis_radio_index.png|400px]] | ||
Revision as of 17:34, 9 November 2017
Vegetation index using the Raster Calculator
- Click the Add raster layer
 and select a multiband Sentinel-2 satellite image
- Check the rank and spectral range of bands in the multiband file (e.g. see table Changing Raster Layer Style).
- After clicking Open, the raster layer appears in the QGIS canvas.
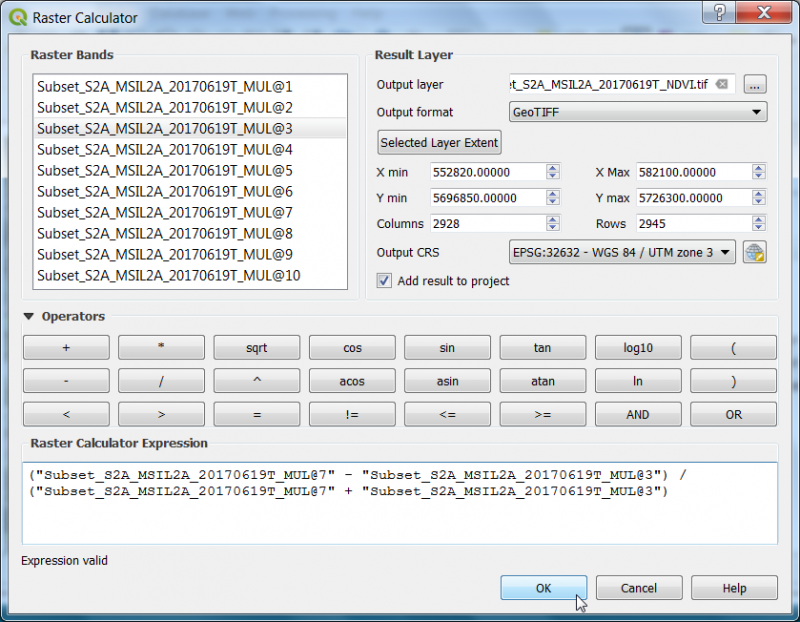
- Click Raster --> Raster calculator.
- A powerful normalization is realized by the normalized difference vegetation index that forms the basis of most vegetation indices $NDVI = (Nir - Red) / (Nir + Red)$. It can be implemented using Raster Calculator as seen in the following screenshot:
- Define path and file name of the output layer. OK.
- Map visualization: Open the raster layer properties by right-clicking the ndvi raster in the TOC selecting Properties, or by simply double clicking.
- Select the Style tab. Under Render type select Singleband pseudocolor.
- In the Generate new color map section select RdYlGn. In the Mode pulldown menu select Equal interval. Set the number of Classes to 10 and click Classify.
- To finish, click Apply.
Spectral indices using OTB
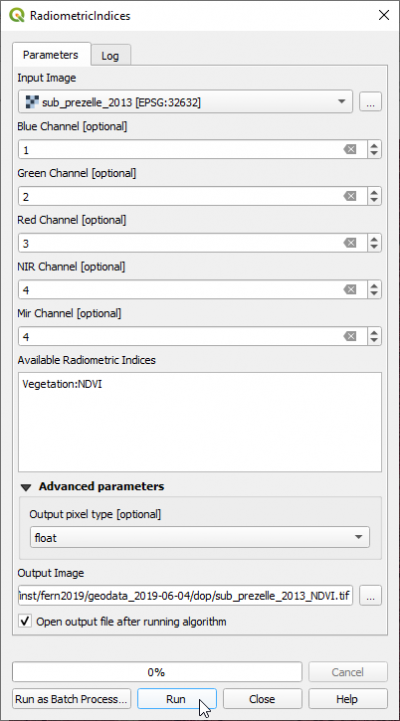
A convenient module for calculating spectral indices can be found in the QGIS processing toolbar. Type Radiometric into the search field and find the Orfeo Toolbox --> Feature Extraction --> Radiometric Indices) tool. Open it with a double click.
Assign the spectral ranges to the right order of bands in the multiband file. Choose ndvi from the Available Radiometric Indices drop-down list. OK.

If you want to calculate several spectral indices and stack the resulting layers into a new multiband file use an OTB Graphical user interface.
- In the Search box on the Windows Start menu type OSGeo4W Shell. You should be able to open the shell by clicking on it.
- Type into the shell: otbgui_RadiometricIndices. Select a multiband input file and assign the spectral ranges to the bands.
- In the Documentation tab you'll find an overview on available spectral indices in three categories (vegetation, water, soil) and the relevant channels of the input image. Several Indices can be selected by CRL + left click. Mark TNDVI, NDWI and BI in the list.
- Display the output multiband spectral indices image as a color composite in the canvas.
