Load a WMS-Layer
(→Add WMS layer) |
(→Add Google Maps layers) |
||
| (25 intermediate revisions by one user not shown) | |||
| Line 22: | Line 22: | ||
# Open {{button|text=Data Source Manager}} [[Image:QGIS_3.0_datasource.png|30px]] | # Open {{button|text=Data Source Manager}} [[Image:QGIS_3.0_datasource.png|30px]] | ||
# Click {{button|text= WMS/WMTS}} [[File:Addwms.png|100px]]. | # Click {{button|text= WMS/WMTS}} [[File:Addwms.png|100px]]. | ||
| − | # {{mitem|text= Layers --> New}}. Type a name for the new WMS connection e.g. {{typed|text= BKG DTK250}}(Digitale Topographische Karte 1:250,000, Bundesamt für Kartographie and Geodäsie, Frankfurt). | + | # {{mitem|text= Layers --> New}}. Type a name for the new WMS connection e.g. {{typed|text= BKG DTK250}} (Digitale Topographische Karte 1:250,000, Bundesamt für Kartographie and Geodäsie, Frankfurt). |
# Type the URL : {{typed|text=http://sg.geodatenzentrum.de/wms_dtk250}} | # Type the URL : {{typed|text=http://sg.geodatenzentrum.de/wms_dtk250}} | ||
[[File:qgis_add_dtk.png|400px]] | [[File:qgis_add_dtk.png|400px]] | ||
# Click {{button|text=OK}} | # Click {{button|text=OK}} | ||
# Click {{button|text=Connect}} | # Click {{button|text=Connect}} | ||
| − | + | # Mark the layer ''dop20'' and click {{button|text=Add}} | |
| − | # Mark | + | |
[[File:qgis_wms_dtk.png|800px]] | [[File:qgis_wms_dtk.png|800px]] | ||
==Add Google Maps layers== | ==Add Google Maps layers== | ||
| + | # Open {{button|text=Data Source Manager}} [[Image:QGIS_3.0_datasource.png|30px]] | ||
# To add the Google Maps map service in QGIS 3 simply, go to XYZ Tiles in the Browser panel. | # To add the Google Maps map service in QGIS 3 simply, go to XYZ Tiles in the Browser panel. | ||
| − | # Right-click on XYZ Tiles and choose {{button|text=New | + | # Right-click on XYZ Tiles and choose XYZ Connections {{button|text=New}}. |
# Enter the name for the WMS Service fo example: {{typed|text=Google Satellite}} | # Enter the name for the WMS Service fo example: {{typed|text=Google Satellite}} | ||
| − | # Copy and paste the URL: | + | # Copy and paste the URL: https://mt1.google.com/vt/lyrs=s&hl=en&x={x}&y={y}&z={z} |
| − | # Adjust the maximum zoom level {{typed|text=19}}. | + | # Adjust the maximum zoom level {{typed|text=19}}, confirm with OK. |
| − | # To view inside QGIS | + | # To view inside QGIS go to the Browser panel. Unfold the XYZ Tiles and double-click or drag the XYZ Tile service to the Layers panel. |
# Configure additional WMS connections in the same manner using the URLs of this table: | # Configure additional WMS connections in the same manner using the URLs of this table: | ||
{| class="wikitable sortable" | {| class="wikitable sortable" | ||
| Line 45: | Line 45: | ||
|- | |- | ||
| Google Satellite | | Google Satellite | ||
| − | | | + | | http://mt0.google.com/vt/lyrs=y&hl=en&x={x}&y={y}&z={z} |
|- | |- | ||
| − | | Google | + | | Google Roads |
| − | | https://mt1.google.com/vt/lyrs= | + | | https://mt1.google.com/vt/lyrs=h&x={x}&y={y}&z={z} |
|- | |- | ||
| − | | Google | + | | Google Satellite Hybrid |
| − | | https://mt1.google.com/vt/lyrs= | + | | https://mt1.google.com/vt/lyrs=y&x={x}&y={y}&z={z} |
| + | |- | ||
| + | | Google Maps | ||
| + | | https://mt1.google.com/vt/lyrs=r&x={x}&y={y}&z={z} | ||
| + | |- | ||
| + | | Bing Maps | ||
| + | | http://ecn.t3.tiles.virtualearth.net/tiles/a{q}.jpeg?g=1 | ||
|- | |- | ||
| OpenStreetMap Mapnick | | OpenStreetMap Mapnick | ||
| http://tile.openstreetmap.org/{z}/{x}/{y}.png | | http://tile.openstreetmap.org/{z}/{x}/{y}.png | ||
|- | |- | ||
| − | | | + | | Open Topo Map |
| − | | | + | | https://tile.opentopomap.org/{z}/{x}/{y}.png |
|- | |- | ||
| − | | | + | | ESRI Base Map |
| − | | | + | | https://server.arcgisonline.com/ArcGIS/rest/services/World_Street_Map/MapServer/tile/{z}/{y}/{x} |
|- | |- | ||
| − | | | + | | ESRI Topography Map |
| − | | http:// | + | | http://services.arcgisonline.com/ArcGIS/rest/services/Elevation/World_Hillshade/MapServer/tile/{z}/{y}/{x} |
| − | + | ||
| − | + | ||
| − | + | ||
|- | |- | ||
| Carto Positron | | Carto Positron | ||
| Line 74: | Line 77: | ||
| http://a.tile.stamen.com/terrain/{z}/{x}/{y}.png | | http://a.tile.stamen.com/terrain/{z}/{x}/{y}.png | ||
|} | |} | ||
| + | |||
| + | ==Add Digital Ortho Photos (DOP) of Lower Saxony== | ||
| + | Since 2022 digital otho photos in Lower Saxony are published as open geodata under the License „Datenlizenz Deutschland – Namensnennung – Version 2.0“. They can be directly downloaded or used as WMS in QGIS. | ||
| + | |||
| + | # Open {{button|text=Data Source Manager}} [[Image:QGIS_3.0_datasource.png|30px]] | ||
| + | # Click {{button|text= WMS/WMTS}} [[File:Addwms.png|100px]]. | ||
| + | # {{mitem|text= Layers --> New}}. Type a name for the new WMS connection e.g. {{typed|text= NDS DOP}} (Digitales Orthophoto Niedersachsen). | ||
| + | # Type the URL : {{typed|text=https://www.geobasisdaten.niedersachsen.de/doorman/noauth/wms_ni_dop?&request=getCapabilities&service=WMS}} | ||
| + | [[File:qgis_add_dop20.png|400px]] | ||
| + | # Click {{button|text=OK}} | ||
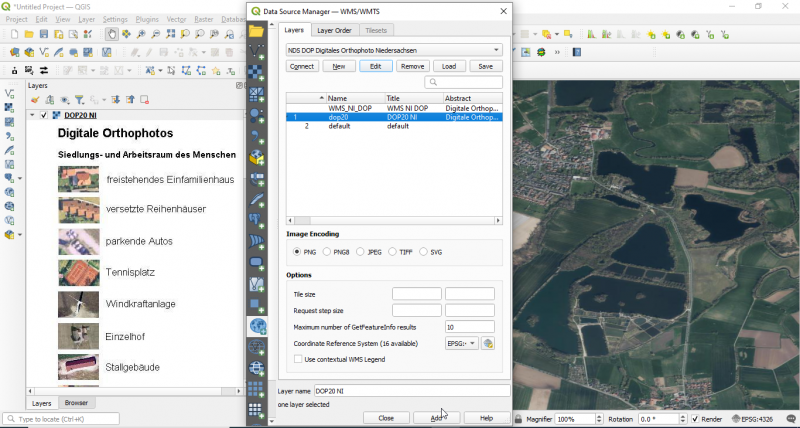
| + | # Click {{button|text=Connect}} | ||
| + | # Now a list of all downloadable layers appears. | ||
| + | # Mark one of the layers and click {{button|text=Add}} | ||
| + | [[File:qgis_wms_dop20.png|800px]] | ||
| + | |||
| + | ==Add Corine Land Cover (CLC) classification of Germany== | ||
| + | Data are provided by the federal administration for carthography and geodesy (BKG) in the framework of the EU project Corine. It is based on land cover model (LBM_DE) and interpretation of satellite images with a revisit time of 3 years. | ||
| + | Open {{button|text=Data Source Manager}} [[Image:QGIS_3.0_datasource.png|30px]] | ||
| + | # Click {{button|text= WMS/WMTS}} [[File:Addwms.png|100px]]. | ||
| + | # {{mitem|text= Layers --> New}}. Type a name for the new WMS connection e.g. {{typed|text= WMS CLC5 2018}} (WMS CORINE Land Cover 2018). | ||
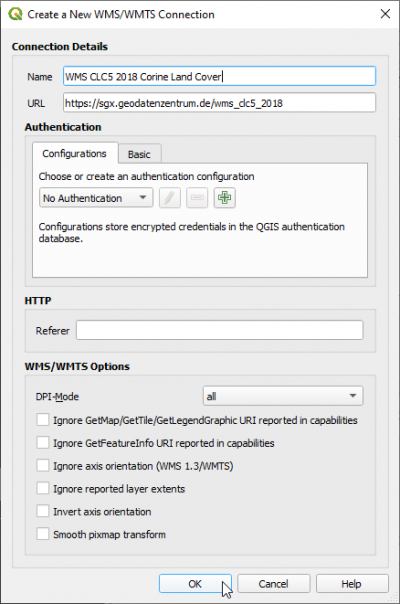
| + | # Type the URL : {{typed|text=https://sgx.geodatenzentrum.de/wms_clc5_2018}} | ||
| + | [[File:qgis_add_clc5.png|400px]] | ||
| + | # Click {{button|text=OK}} | ||
| + | # Click {{button|text=Connect}} | ||
| + | # A list of downloadable layers appears. | ||
| + | # Mark one of the layers and click {{button|text=Add}} | ||
==Related articles== | ==Related articles== | ||
Latest revision as of 13:03, 2 November 2022
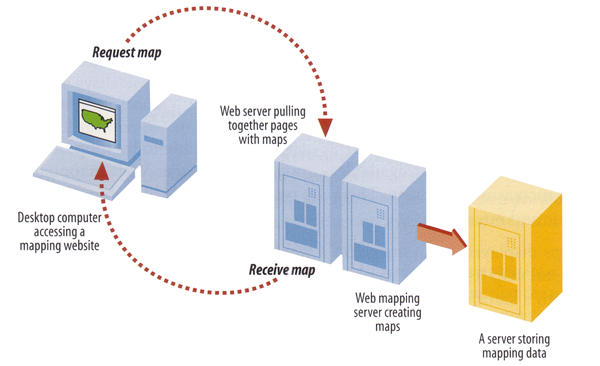
WMS stands for Web Map Service. WMS produces maps of spatially referenced data dynamically from geographic information. These maps are rendered in a pictorial format for example PNG, GIF or JPEG. The operations can be done using a standard web browser which submitt requests in form of a URL. The OGC WMS specification standardizes the way in which maps are requested by clients and the way that servers describe their data holdings.
Contents |
[edit] Clients
A growing number of clients supporting WMS or WFS standards.
- ArcGIS
- Quantum GIS
- UDIG
- OpenLayes - pure javascript library for displying map data in most web browsers
[edit] Requests
There are differnt types of requests, but only two are required by any wms server:
- GetCapabilities - returns parameters about the WMS and the available layers
- GetMap - with parameters provided, returns a map image
[edit] Add WMS layer
If you want to integrate a WMS-Layer to QGIS 3 follow these steps:
- Open Data Source Manager

- Click WMS/WMTS
 .
.
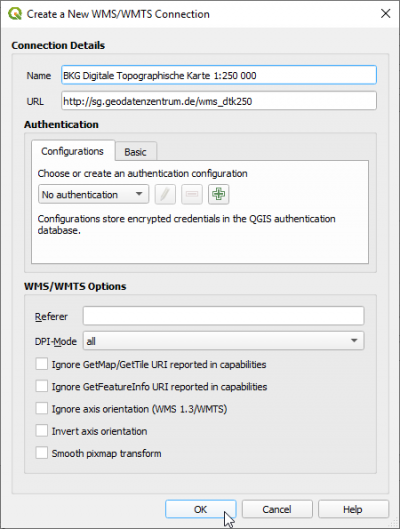
- Layers --> New. Type a name for the new WMS connection e.g. BKG DTK250 (Digitale Topographische Karte 1:250,000, Bundesamt für Kartographie and Geodäsie, Frankfurt).
- Type the URL : http://sg.geodatenzentrum.de/wms_dtk250
- Click OK
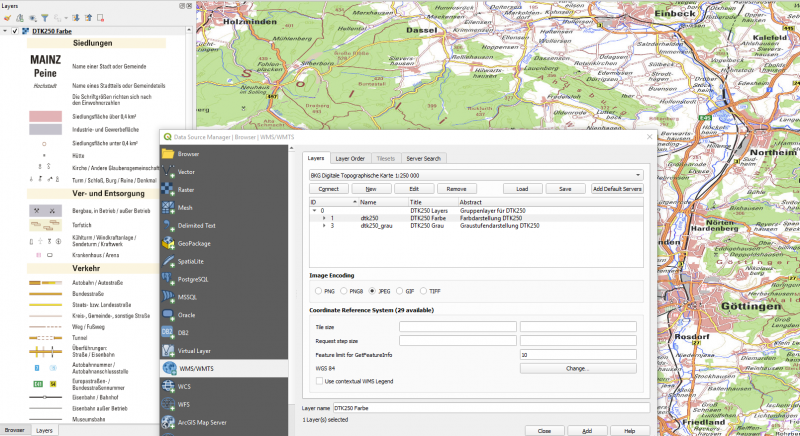
- Click Connect
- Mark the layer dop20 and click Add
[edit] Add Google Maps layers
- Open Data Source Manager

- To add the Google Maps map service in QGIS 3 simply, go to XYZ Tiles in the Browser panel.
- Right-click on XYZ Tiles and choose XYZ Connections New.
- Enter the name for the WMS Service fo example: Google Satellite
- Copy and paste the URL: https://mt1.google.com/vt/lyrs=s&hl=en&x={x}&y={y}&z={z}
- Adjust the maximum zoom level 19, confirm with OK.
- To view inside QGIS go to the Browser panel. Unfold the XYZ Tiles and double-click or drag the XYZ Tile service to the Layers panel.
- Configure additional WMS connections in the same manner using the URLs of this table:
| WMS Name | URL |
|---|---|
| Google Satellite | http://mt0.google.com/vt/lyrs=y&hl=en&x={x}&y={y}&z={z} |
| Google Roads | https://mt1.google.com/vt/lyrs=h&x={x}&y={y}&z={z} |
| Google Satellite Hybrid | https://mt1.google.com/vt/lyrs=y&x={x}&y={y}&z={z} |
| Google Maps | https://mt1.google.com/vt/lyrs=r&x={x}&y={y}&z={z} |
| Bing Maps | http://ecn.t3.tiles.virtualearth.net/tiles/a{q}.jpeg?g=1 |
| OpenStreetMap Mapnick | http://tile.openstreetmap.org/{z}/{x}/{y}.png |
| Open Topo Map | https://tile.opentopomap.org/{z}/{x}/{y}.png |
| ESRI Base Map | https://server.arcgisonline.com/ArcGIS/rest/services/World_Street_Map/MapServer/tile/{z}/{y}/{x} |
| ESRI Topography Map | http://services.arcgisonline.com/ArcGIS/rest/services/Elevation/World_Hillshade/MapServer/tile/{z}/{y}/{x} |
| Carto Positron | https://cartodb-basemaps-a.global.ssl.fastly.net/light_all/{z}/{x}/{y}.png |
| Stamen Terrain | http://a.tile.stamen.com/terrain/{z}/{x}/{y}.png |
[edit] Add Digital Ortho Photos (DOP) of Lower Saxony
Since 2022 digital otho photos in Lower Saxony are published as open geodata under the License „Datenlizenz Deutschland – Namensnennung – Version 2.0“. They can be directly downloaded or used as WMS in QGIS.
- Open Data Source Manager

- Click WMS/WMTS
 .
.
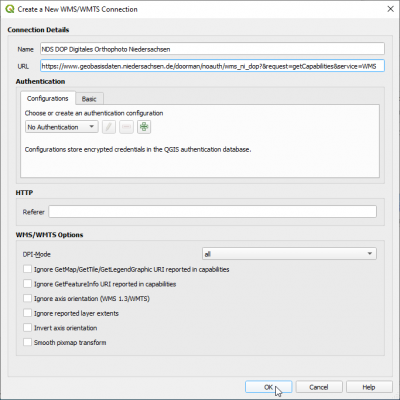
- Layers --> New. Type a name for the new WMS connection e.g. NDS DOP (Digitales Orthophoto Niedersachsen).
- Type the URL : https://www.geobasisdaten.niedersachsen.de/doorman/noauth/wms_ni_dop?&request=getCapabilities&service=WMS
- Click OK
- Click Connect
- Now a list of all downloadable layers appears.
- Mark one of the layers and click Add
[edit] Add Corine Land Cover (CLC) classification of Germany
Data are provided by the federal administration for carthography and geodesy (BKG) in the framework of the EU project Corine. It is based on land cover model (LBM_DE) and interpretation of satellite images with a revisit time of 3 years.
Open Data Source Manager ![]()
- Click WMS/WMTS
 .
.
- Layers --> New. Type a name for the new WMS connection e.g. WMS CLC5 2018 (WMS CORINE Land Cover 2018).
- Type the URL : https://sgx.geodatenzentrum.de/wms_clc5_2018
- Click OK
- Click Connect
- A list of downloadable layers appears.
- Mark one of the layers and click Add
