Processing Ebee UAV images
From AWF-Wiki
(Difference between revisions)
(Created page with "== Post Flight Processing in Emotion3 software == # Find and copy the flight log (*.bb3) for the mission that should be processed # Find and copy the folder with the images f...") |
|||
| (5 intermediate revisions by one user not shown) | |||
| Line 3: | Line 3: | ||
# Find and copy the flight log (*.bb3) for the mission that should be processed | # Find and copy the flight log (*.bb3) for the mission that should be processed | ||
# Find and copy the folder with the images for the mission that should be processed | # Find and copy the folder with the images for the mission that should be processed | ||
| − | # Start Emotion3 Software and select | + | # Start Emotion3 Software and select Postflight |
| − | [[File:Emotion3_Postflight1.png]] | + | [[File:Emotion3_Postflight1.png|300px|Image:300 pixels]] |
| + | |||
| + | # Assign project name (use PlotID here e.g. AEG04) | ||
| + | # Select output folder and confirm with 'next' | ||
| + | # Browse for the *.bb3 file and confirm with 'next' | ||
| + | # In the next tab select PPK: Process drones' raw GNSS data | ||
| + | |||
| + | [[File:Emotion3_Postflight2.png|400px|Image:400 pixels]] | ||
| + | # Prepare a RINEX observation file by recording the GPS time and duration of the flight and select the approximate center coordinates of the flight area as position for the virtual refernce station. | ||
| + | # Go to [http://www.sapos-bw.de/ SAPOS] and login in | ||
| + | # Select GNSS Shop -> RINEX Download -> Virtual Reference Station (VRS) | ||
| + | |||
| + | [[File:SAPOS-bw_rinex_download.png]] | ||
| + | |||
| + | # Enter the date, time, duration and coordinates of the VRS into the form. Select 1 second intervalls for Ebee data | ||
| + | # Submitt the order and wait until the processing is finished | ||
| + | # Download the RINEX Zip file, extract it and insert the path to the observation file (*.o) to the Emotion3 software | ||
| + | Now the reference station coordinates and antenna model should become visible | ||
| + | # Start GNSS-Postprocessing by confirming the settings with 'next' | ||
| + | # Check if post processing was applied to all / most of the images and controll for the final positional accuracy | ||
| + | |||
| + | [[File:PPK_GNSS.png|300px|Image:300 pixels]] | ||
| + | |||
| + | # If everything is o.k. than confirm the PPK Processing by 'next' | ||
| + | # Select the image folder where all images of that mission are stored and import them | ||
| + | # Check if all images are found | ||
| + | |||
| + | [[File:Emotion3ImageUpload.png]] | ||
| + | |||
| + | # Import the images by confirming with 'next' | ||
| + | # Select the output files including compressed images, text file and Pix4D project file | ||
| + | |||
| + | [[File:Select_Output.png|300px|Image:300 pixels]] | ||
Latest revision as of 16:36, 4 March 2019
[edit] Post Flight Processing in Emotion3 software
- Find and copy the flight log (*.bb3) for the mission that should be processed
- Find and copy the folder with the images for the mission that should be processed
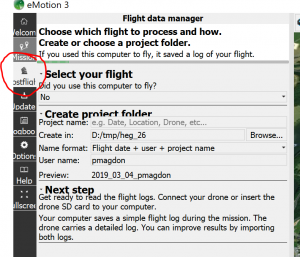
- Start Emotion3 Software and select Postflight
- Assign project name (use PlotID here e.g. AEG04)
- Select output folder and confirm with 'next'
- Browse for the *.bb3 file and confirm with 'next'
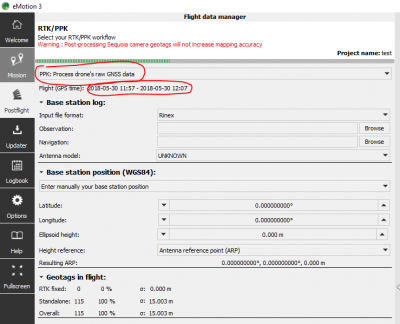
- In the next tab select PPK: Process drones' raw GNSS data
- Prepare a RINEX observation file by recording the GPS time and duration of the flight and select the approximate center coordinates of the flight area as position for the virtual refernce station.
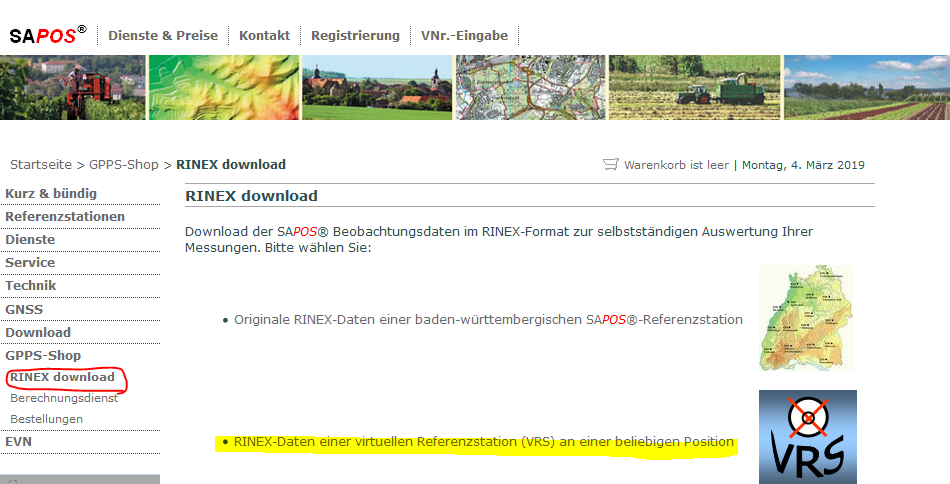
- Go to SAPOS and login in
- Select GNSS Shop -> RINEX Download -> Virtual Reference Station (VRS)
- Enter the date, time, duration and coordinates of the VRS into the form. Select 1 second intervalls for Ebee data
- Submitt the order and wait until the processing is finished
- Download the RINEX Zip file, extract it and insert the path to the observation file (*.o) to the Emotion3 software
Now the reference station coordinates and antenna model should become visible
- Start GNSS-Postprocessing by confirming the settings with 'next'
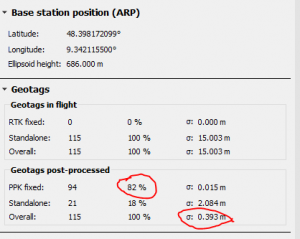
- Check if post processing was applied to all / most of the images and controll for the final positional accuracy
- If everything is o.k. than confirm the PPK Processing by 'next'
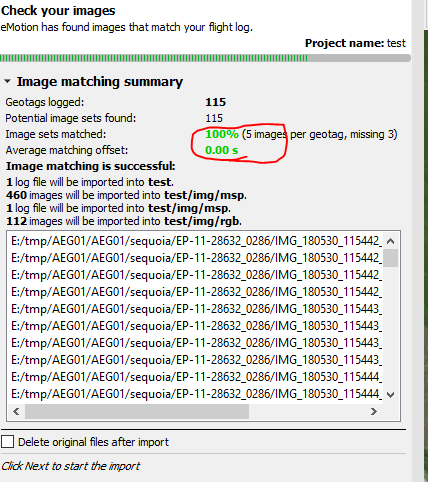
- Select the image folder where all images of that mission are stored and import them
- Check if all images are found
- Import the images by confirming with 'next'
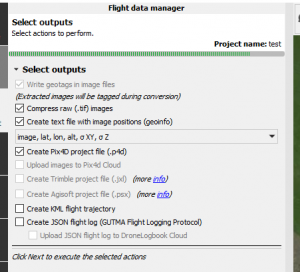
- Select the output files including compressed images, text file and Pix4D project file
