Downloading Sentinel-2 images
From AWF-Wiki
(Difference between revisions)
(→Using the Open Hub) |
|||
| (15 intermediate revisions by one user not shown) | |||
| Line 1: | Line 1: | ||
== Using the Open Hub == | == Using the Open Hub == | ||
* Visit the [https://scihub.copernicus.eu/ Copernicus Open Access Hub] and click on '''Open Hub'''. | * Visit the [https://scihub.copernicus.eu/ Copernicus Open Access Hub] and click on '''Open Hub'''. | ||
| − | [[File:copernicus_oah.png| | + | [[File:copernicus_oah.png|600px]] |
| − | * Register for a new account | + | * Register for a new account: click Login and '''Sign-up''' on the upper right. |
| − | You will receive an | + | |
| − | * | + | [[File:copernicus_register.png|400px]] |
| − | * Activate the ''' | + | |
| − | + | You will receive an email with a link to validate your email address. Following this you can login and start to search for data. | |
| − | * Open the tab on the upper left | + | * The '''Navigation''' mode [[File:copernicus_naviagtion_mode.png|30px]] on upper right of the web map is activated by default. Pan to your region of interest holding left click. Zoom into your region of interest using the middle mouse wheel or enable a middle-click with gestures on your touchpad. |
| − | * Enter the | + | * Activate the '''Area''' mode [[File:copernicus_area_mode.png|30px]]. Draw a rectangle holding left click or digitize a polygon with several left clicks. End digitizing by a double click. |
| − | * Activate the checkbox of the '''Mission: Sentinel-2'''. | + | |
| − | * Click on | + | [[File:copernicus_sensor_selection.png|400px]] |
| − | * Have a closer look on the | + | |
| + | * Open the tab on the upper left and enter search criteria (please see overview on all options for [https://scihub.copernicus.eu/userguide/4AdvancedSearch Advanced Search]). | ||
| + | |||
| + | * Enter the '''Sensing period'' of interest by entering the "from" and "to" date. | ||
| + | [[File:copernicus_search_criteria.png|400px]] | ||
| + | * Activate the checkbox of the '''Mission:Sentinel-2'''. | ||
| + | * Choose the '''Product type''' (Level 1C: '''S2MSI1C''' or Level 2A: '''S2MSI2A'''). | ||
| + | * Choose '''Cloud Cover %''': '''[0 TO 20]'''. | ||
| + | * Click on [[File:copernicus_search_run.png|30px]] to run a search and display available satellite scenes. | ||
| + | * Have a closer look on the previews. Select a single product or add several products to a cart for downloading. | ||
[[Category:Downloading satellite images]] | [[Category:Downloading satellite images]] | ||
Latest revision as of 11:40, 25 October 2019
[edit] Using the Open Hub
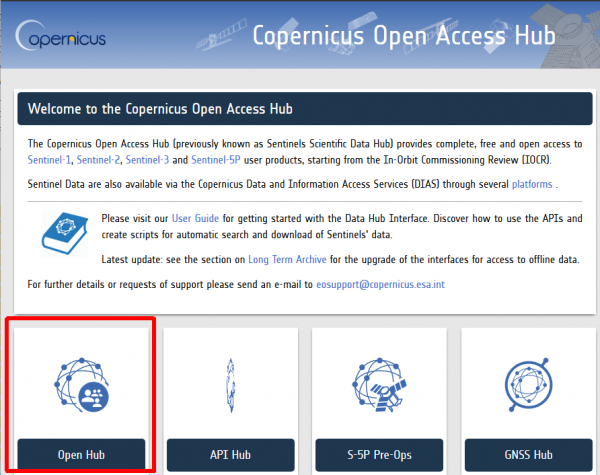
- Visit the Copernicus Open Access Hub and click on Open Hub.
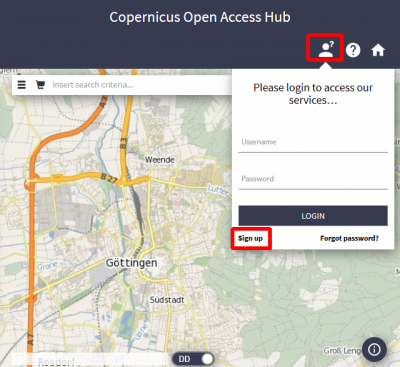
- Register for a new account: click Login and Sign-up on the upper right.
You will receive an email with a link to validate your email address. Following this you can login and start to search for data.
- The Navigation mode
 on upper right of the web map is activated by default. Pan to your region of interest holding left click. Zoom into your region of interest using the middle mouse wheel or enable a middle-click with gestures on your touchpad.
- Activate the Area mode
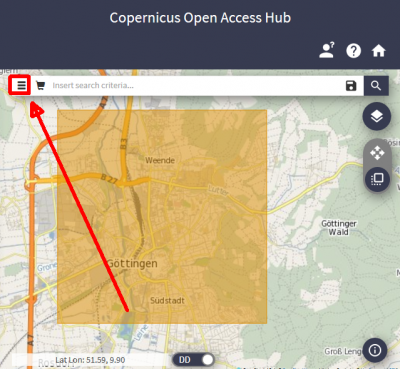
 . Draw a rectangle holding left click or digitize a polygon with several left clicks. End digitizing by a double click.
- Open the tab on the upper left and enter search criteria (please see overview on all options for Advanced Search).
- Enter the 'Sensing period of interest by entering the "from" and "to" date.
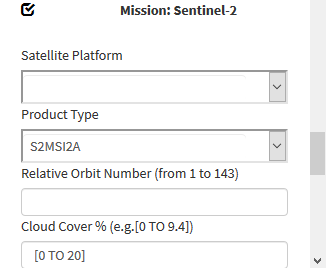
- Activate the checkbox of the Mission:Sentinel-2.
- Choose the Product type (Level 1C: S2MSI1C or Level 2A: S2MSI2A).
- Choose Cloud Cover %: [0 TO 20].
- Click on
 to run a search and display available satellite scenes.
- Have a closer look on the previews. Select a single product or add several products to a cart for downloading.


