Split stack
From AWF-Wiki
(Difference between revisions)
(→Using OTB SplitImage) |
|||
| Line 1: | Line 1: | ||
=Using OTB SplitImage= | =Using OTB SplitImage= | ||
| + | # Click the {{button|text=Open Data Source Manager}} [[Image:QGIS_3.0_datasource.png|30px]] and then {{button|text=Add raster layer}} [[Image:QGIS_2.0_addrast.png|20px]] and select the file ''/geodata/raster/s2/Subset_S2A_MSIL2A_20170619T_MUL.tif''. | ||
=Using GDAL Translate= | =Using GDAL Translate= | ||
Revision as of 18:37, 21 October 2018
Using OTB SplitImage
- Click the Open Data Source Manager
 and then Add raster layer
  and select the file /geodata/raster/s2/Subset_S2A_MSIL2A_20170619T_MUL.tif.
Using GDAL Translate
- Click the Add raster layer
 and select the file C:/OSGeo4W64/geodata/raster/s2/Subset_S2A_MSIL2A_20170619T.tif.
- After clicking Open, the raster layer appears on the QGIS canvas.
- Click Processing --> Options. Unfold the General folder. Switch the checkbox on: Keep dialog open after running an algorithm.
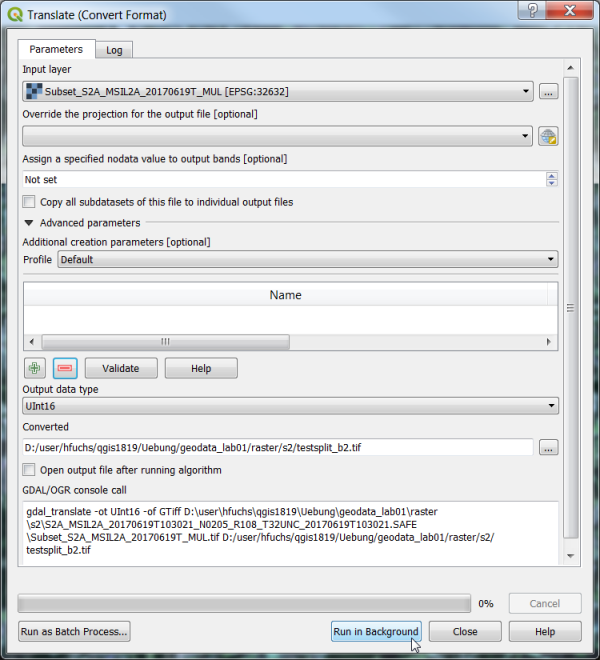
- In the processing toolbar, type Translate into the search field to find the GDAL\OGR --> Translate (Convert format) tool and open it.
- Unfold the Advanced parameters and change the output data format to unsigned 16bit integer): -ot UInt16
- Click the button ... of Converted to select path and name of output file.
- Type in the textbox Additional creation parameters: -b 1
( This selects only the first band).
- Click Run.
- Repeat the steps for other bands: change the name of the output file and edit the -b option accordingly.
- Create a multiband file with a spectral subset of 4 bands. Change the output file and the additional creation options:
- Converted output file:Subset_S2A_MSIL2A_20170619T_B02030408.tif
- Additional creation parameters: -b 2 -b 3 -b 4 -b 8
- Click Run.
