Unsupervised classification (Tutorial)
From AWF-Wiki
(Difference between revisions)
(→Unsupervised K-Means classification) |
|||
| Line 1: | Line 1: | ||
==Unsupervised K-Means classification== | ==Unsupervised K-Means classification== | ||
| − | + | * In the search engine of the Processing Toolbox, type {{typed|text=kmeans}} and double click '''KMeansClassification''' of OTB. | |
| − | + | ||
| − | * In the search engine of the Processing Toolbox, type {{typed|text=kmeans}} and double click '''KMeansClassification'''. | + | |
* Specify a multispectral image as Input Image. | * Specify a multispectral image as Input Image. | ||
* Specify directory and name for the Output image. Select the output data type {{button|text=uint 8}} from the pull-down list. | * Specify directory and name for the Output image. Select the output data type {{button|text=uint 8}} from the pull-down list. | ||
Revision as of 13:54, 17 June 2020
Unsupervised K-Means classification
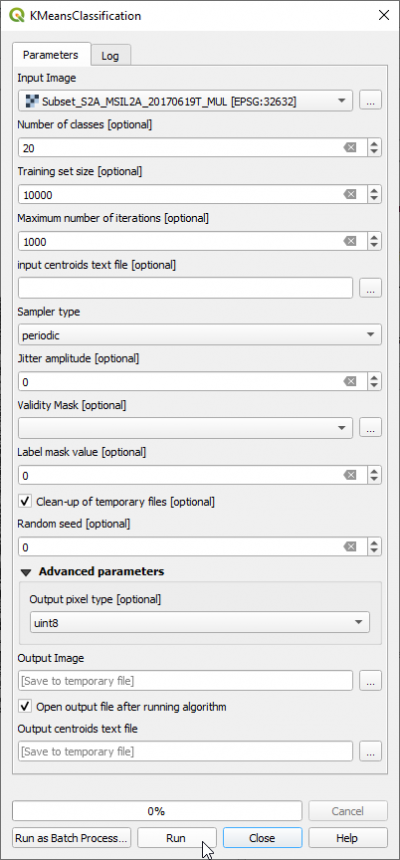
- In the search engine of the Processing Toolbox, type kmeans and double click KMeansClassification of OTB.
- Specify a multispectral image as Input Image.
- Specify directory and name for the Output image. Select the output data type uint 8 from the pull-down list.
- Set the Number of classes to 20
- Check the Training set size to 10000
- Output pixel type: uint8
- Click on Run.
- Load the resulting image into QGIS. It is single band file with 20 grey levels labeled from 0 to 19.
- Layer Properties --> Symbology --> Render type. Switch to Singleband pseudocolor and select a Color ramp (e.g. Spectral). Select the Mode Equal interval and set the number of classes to 20
