Collecting training data
From AWF-Wiki
(Difference between revisions)
(→Create a new vector layer) |
(→Create a new vector layer) |
||
| Line 15: | Line 15: | ||
#** Select {{button|text=Whole number (integer)}} as Type. | #** Select {{button|text=Whole number (integer)}} as Type. | ||
#** Confirm with {{button|text=Add to Fields List}}. {{button|text=OK}}. | #** Confirm with {{button|text=Add to Fields List}}. {{button|text=OK}}. | ||
| − | [[File: | + | [[File:qgis_add_new_poly_vector_layer.png|400px]] |
== Configure vector digitizing == | == Configure vector digitizing == | ||
Latest revision as of 06:27, 6 June 2022
Contents |
[edit] Non-statistical based selection
[edit] Prepare sources for reference data collection
- Load a LUC classification map of the Urban European Atlas for Göttingen in vector format. (Loading vector data)
- Load Digital aerial Ortho Photos (DOP) published as "Google Satellite". (Load a WMS-Layer).
- Load a multiband (B2,B3,B4,B5,B6,B7,B8,B8A,B11,B12) Sentinel-2 satellite image and display a false color composite (RGB = B8,B11,B4 =7,9,3). (Changing Raster Layer Style)
- Right click on the satellite image file name in Layers window. Layer CRS --> Set Project CRS from Layer.
[edit] Create a new vector layer
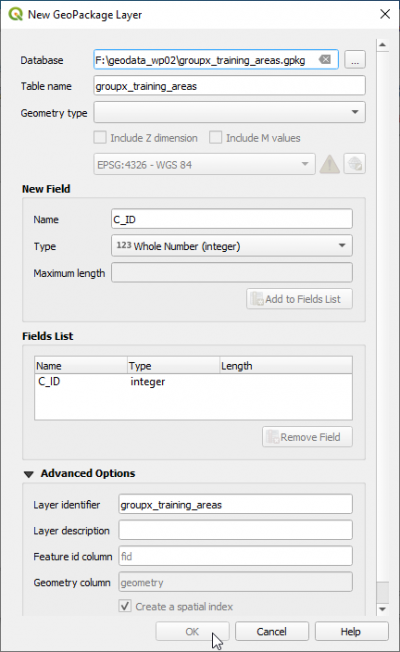
- Select Layer --> Create Layer --> New Geopackage Layer.
- Define path and file name.
- As Geometry type, select Polygon.
- Click the Specify CRS button and select the Project CRS: EPSG:32632 - WGS84 / UTM32N.
- Adding an additional column in the attibute table:
- For the attribute's name type C_ID into the Name field of the New field section.
- Select Whole number (integer) as Type.
- Confirm with Add to Fields List. OK.
[edit] Configure vector digitizing
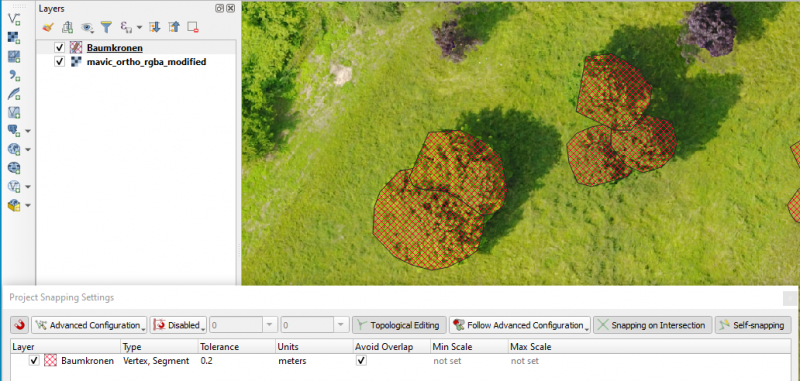
- Select Project --> Snapping options.
- Activate Snapping clicking on
 .
.
- Change the dropdown list All Layers to Advanced Configuration
- Activate the checkbox of a vector layer for which you wish to configure snapping.
- Click in the Type column of the vector layer. In the dropdown list activate Vertex and Segment.
- Choose Units meters.
- Select the snapping Tolerance 2(meters).
- Activate the checkbox Avoid overlap.
- Activate Topological Editing and Snapping on Intersection
[edit] Start digitizing
- Mark the new vector file in the Layers window. Start the edit mode by clicking the Toggle editing button
 .
.
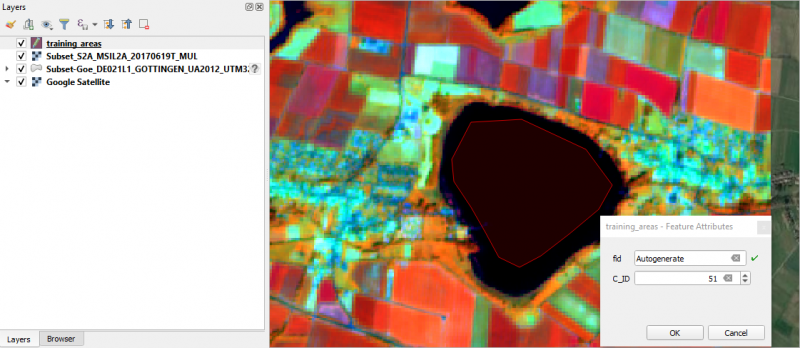
- Let's start with land cover class Water. Use the European Urban Atlas to find water bodies. Zoom in to a lake.
- Click Add feature
 to start digitizing. Start drawing polygons with left click. Finish the geometry by right-clicking.
- Enter the LUC class in the C_ID field. OK
You may always delete a polygon by simply clicking Cancel in the attributes dialogue, or by selecting it ![]() and deleting with the Delete selected
and deleting with the Delete selected ![]() button.
Save your edits by clicking at times on
button.
Save your edits by clicking at times on ![]() .
Finish the edit mode by clicking Toggle editing
.
Finish the edit mode by clicking Toggle editing ![]() .
.


