Configure vector digitization
From AWF-Wiki
(Difference between revisions)
| Line 10: | Line 10: | ||
# Activate the checkbox '''Avoid overlap'''. | # Activate the checkbox '''Avoid overlap'''. | ||
# Change from {{button|text=Allow Overlap}} to {{button|text=Follow Advanced configuration}} | # Change from {{button|text=Allow Overlap}} to {{button|text=Follow Advanced configuration}} | ||
| − | # Activate {{button|text=Snapping on intersection}} and {{button|text=Self-snapping}} | + | # Activate {{button|text=Topological editing}}, {{button|text=Snapping on intersection}} and {{button|text=Self-snapping}} |
[[file:Qgis_snap_opt.png|800px]] | [[file:Qgis_snap_opt.png|800px]] | ||
[[category:Working with Vector Data]] | [[category:Working with Vector Data]] | ||
Latest revision as of 18:18, 14 June 2021
- Load a georeferenced raster file as background layer (e.g. mavic_ortho_rgba_modified.tif)
- Make sure that the Project Cordinate reference system Project --> Properties --> CRS is metric, e.g. WGS84 / UTM zone 32N, EPSG:32632
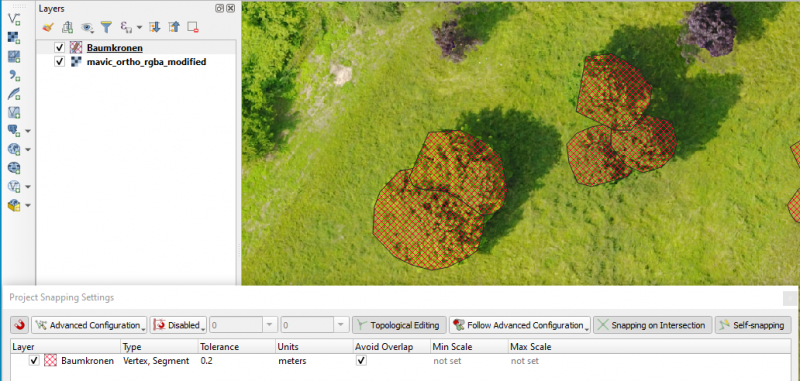
- Select Project --> Snapping options.
- Activate Snapping clicking on the left (magnet) button .
- Change All Layers to Advanced Configuration
- Activate one or several vector layers for which you wish to configure snapping.
- In the drpdown list Type activate vertex and segment.
- Choose Units meters.
- Select the snapping Tolerance in meters 0.2.
- Activate the checkbox Avoid overlap.
- Change from Allow Overlap to Follow Advanced configuration
- Activate Topological editing, Snapping on intersection and Self-snapping
